Start here
For everyone
LUCON EVENTS handles an event from the first registration to the final report: online registration (free or paid), QR tickets by email, check-in and badge printing, meal and door control, session agenda, sponsor lead scanning, a live arrivals screen, and reports.
The four kinds of account
Each person signs in at events.luconhouse.com/admin with their own email and password. What they can see depends on their role for each event.
| What they can do | Super Admin (Lucon House) | Client Admin | Registration Staff | Viewer |
|---|---|---|---|---|
| Create events, publish them, add staff | Yes | No | No | No |
| Event settings, categories, prices, badge design, printers | Yes | Yes | No | No |
| Check in guests, print badges, register walk-ins | Yes | Yes | Yes | No |
| Scan meals and doors | Yes | Yes | Yes | No |
| Reports and Excel/CSV exports | Yes | Yes | No | Yes |
| Which events | All | Only the ones they were added to | Only the ones they were added to | Only the ones they were added to |
Lucon House admin
For the Super Admin
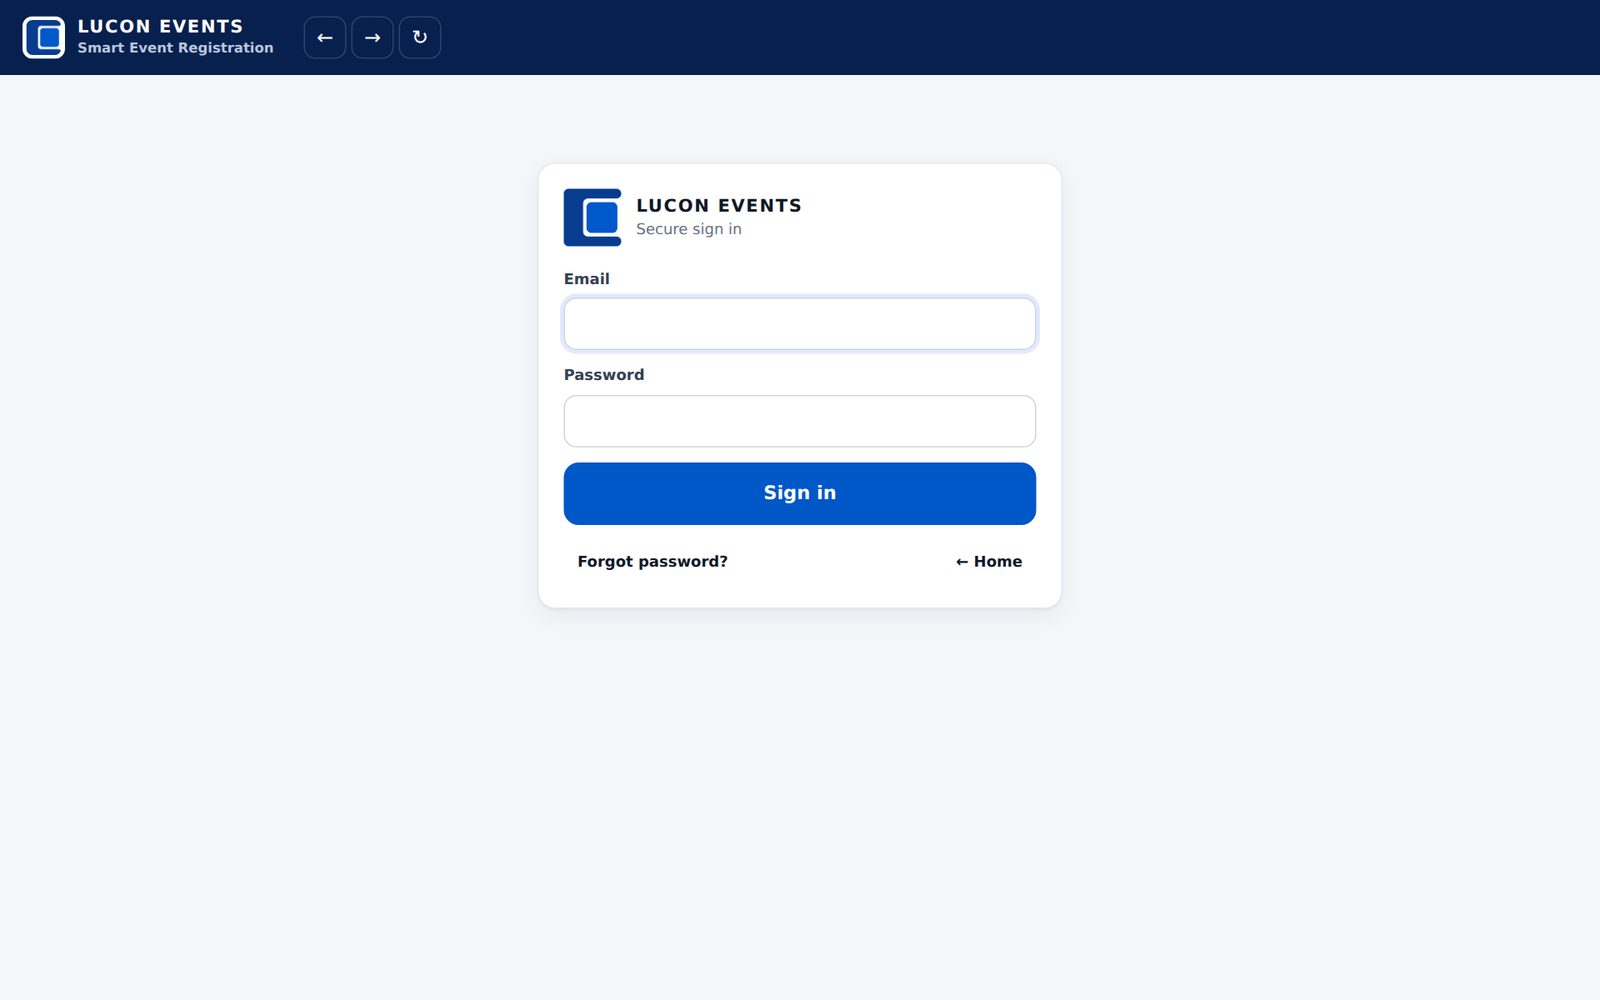
Sign in
- Open events.luconhouse.com/admin.
- Type your email and password, then click Sign in.
- If you turned on two-step verification, type the 6-digit code from your authenticator app.
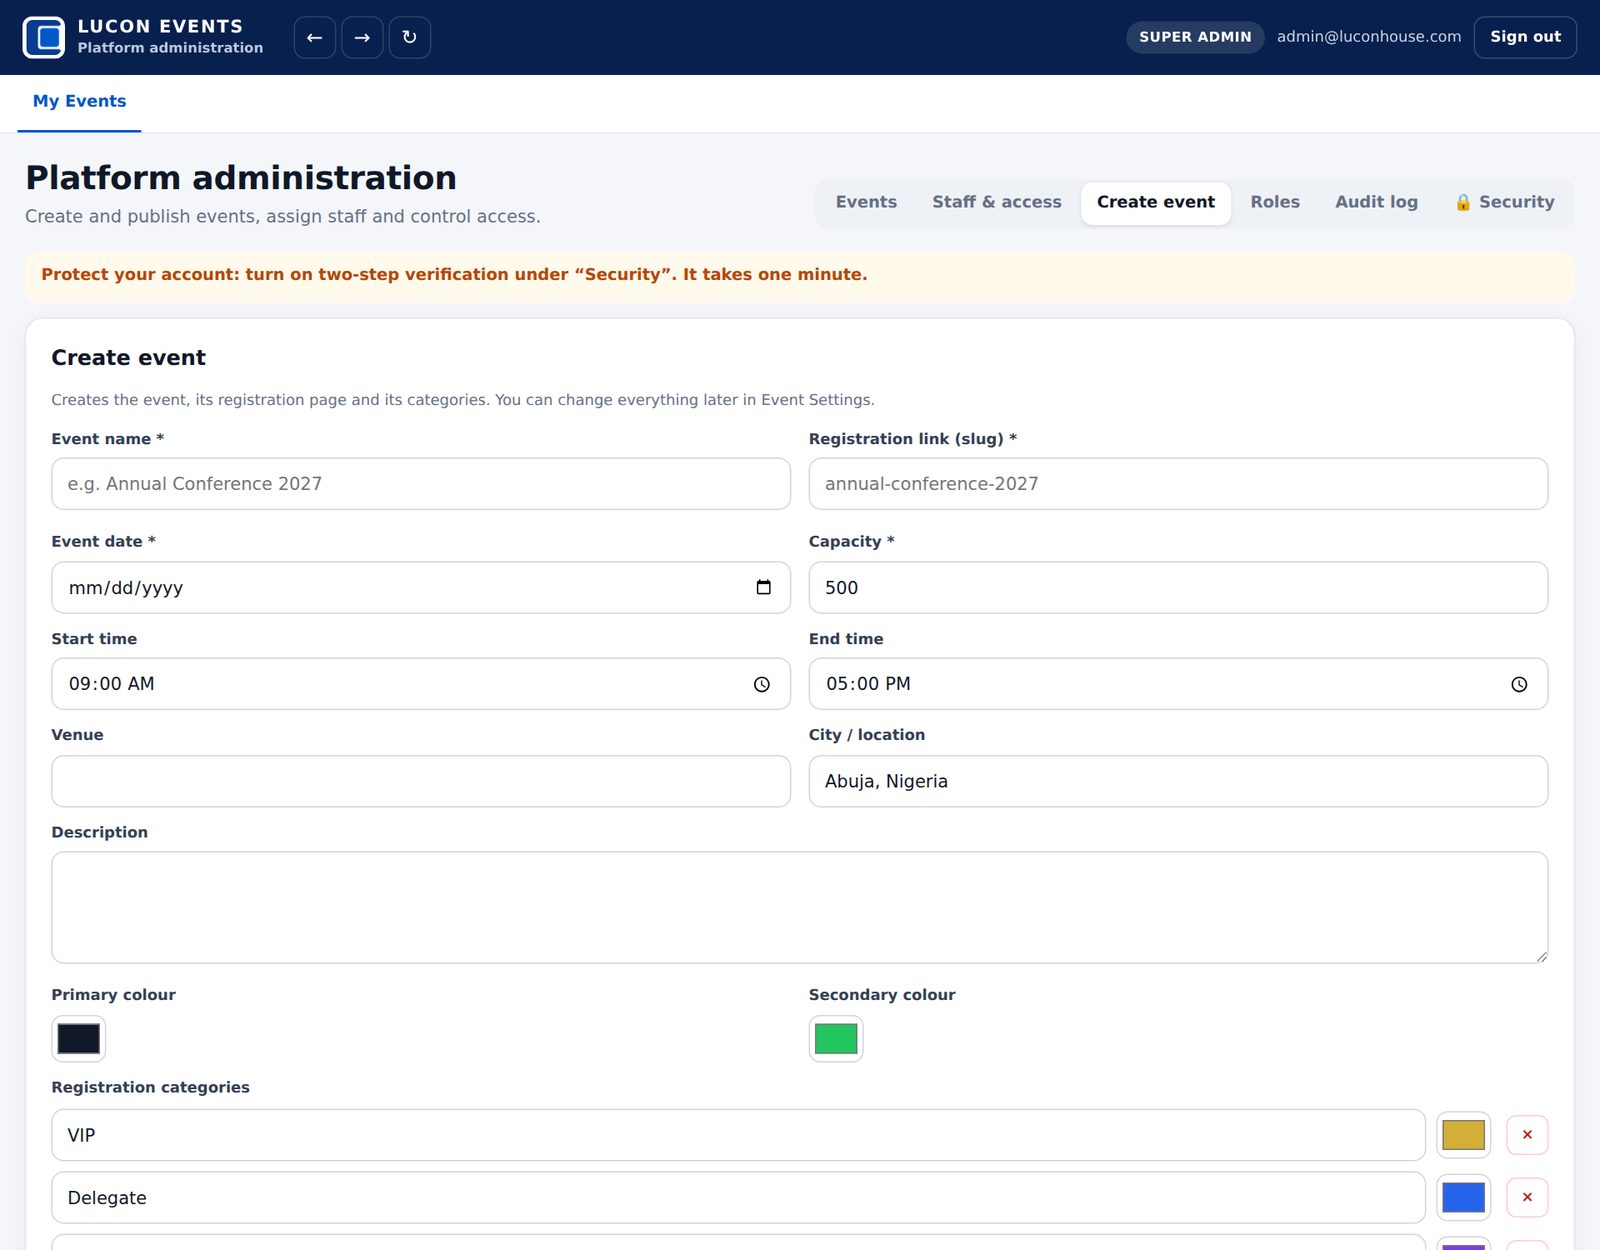
Create an event
- Click the Create event tab.
- Fill in the event name, date, start and end time, capacity, venue and city. Put only the hall or hotel in Venue and only the city in City.
- Check the registration categories (VIP, Delegate, Speaker…). You can change them later.
- Tick Publish immediately if the registration page should open now, then click Create event.
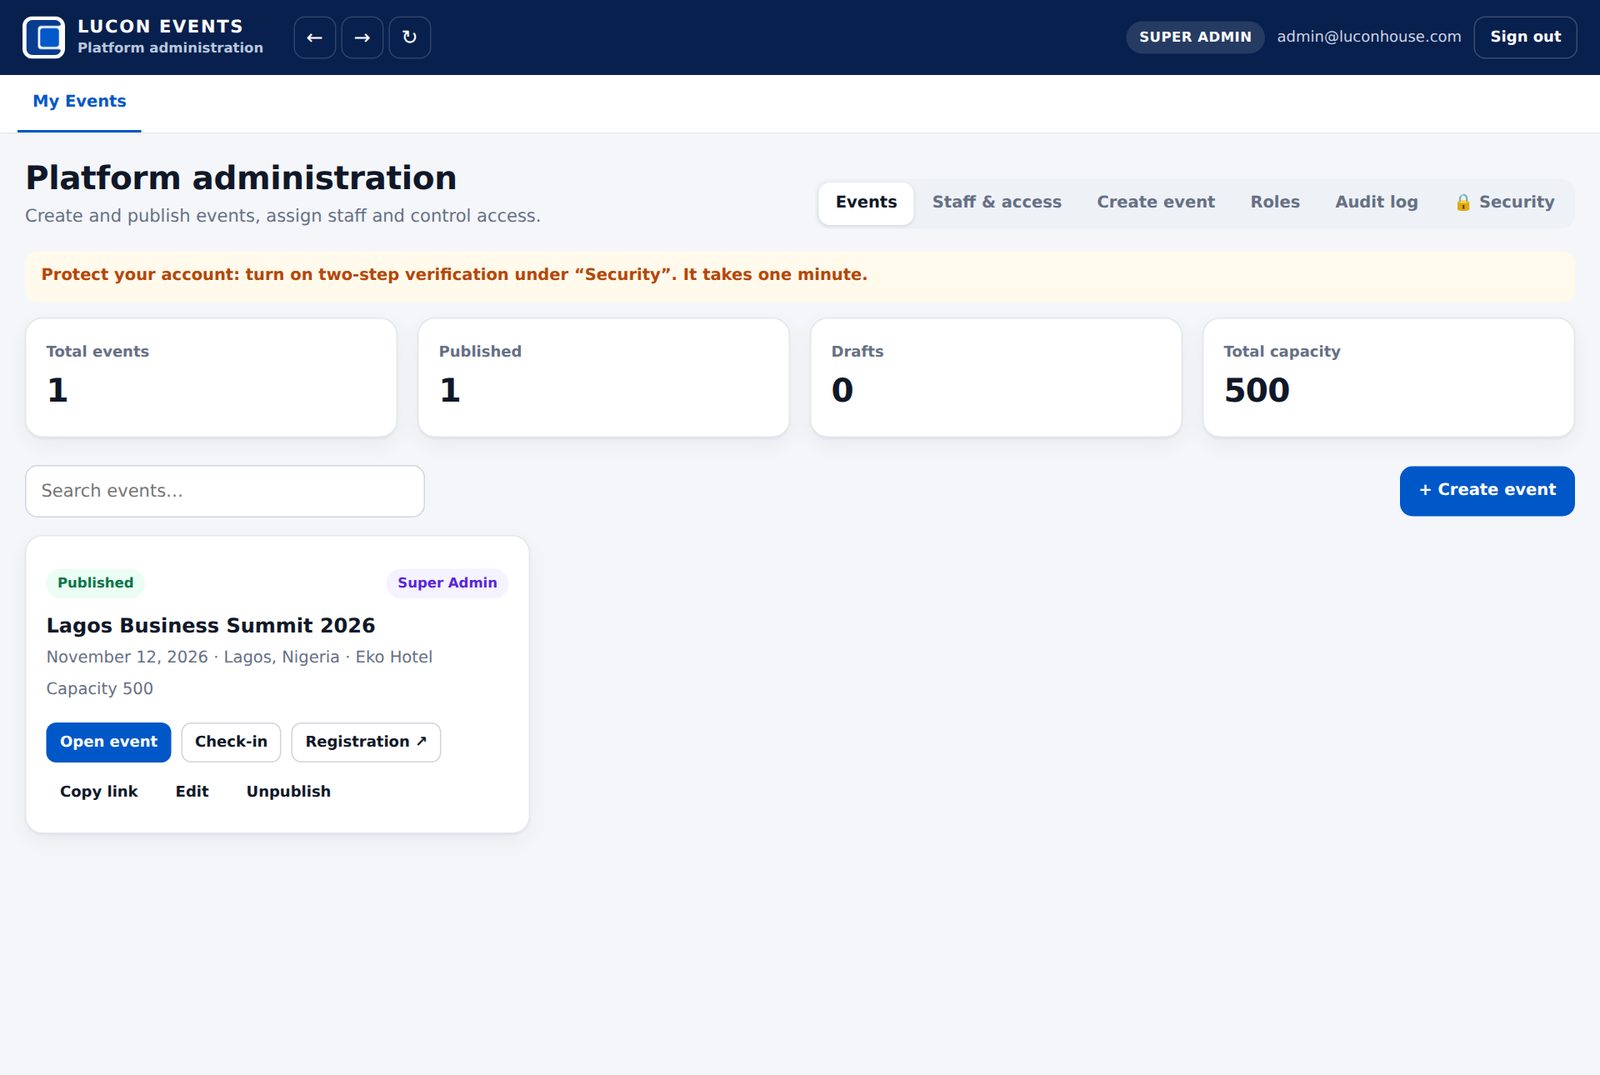
Add a client or staff member
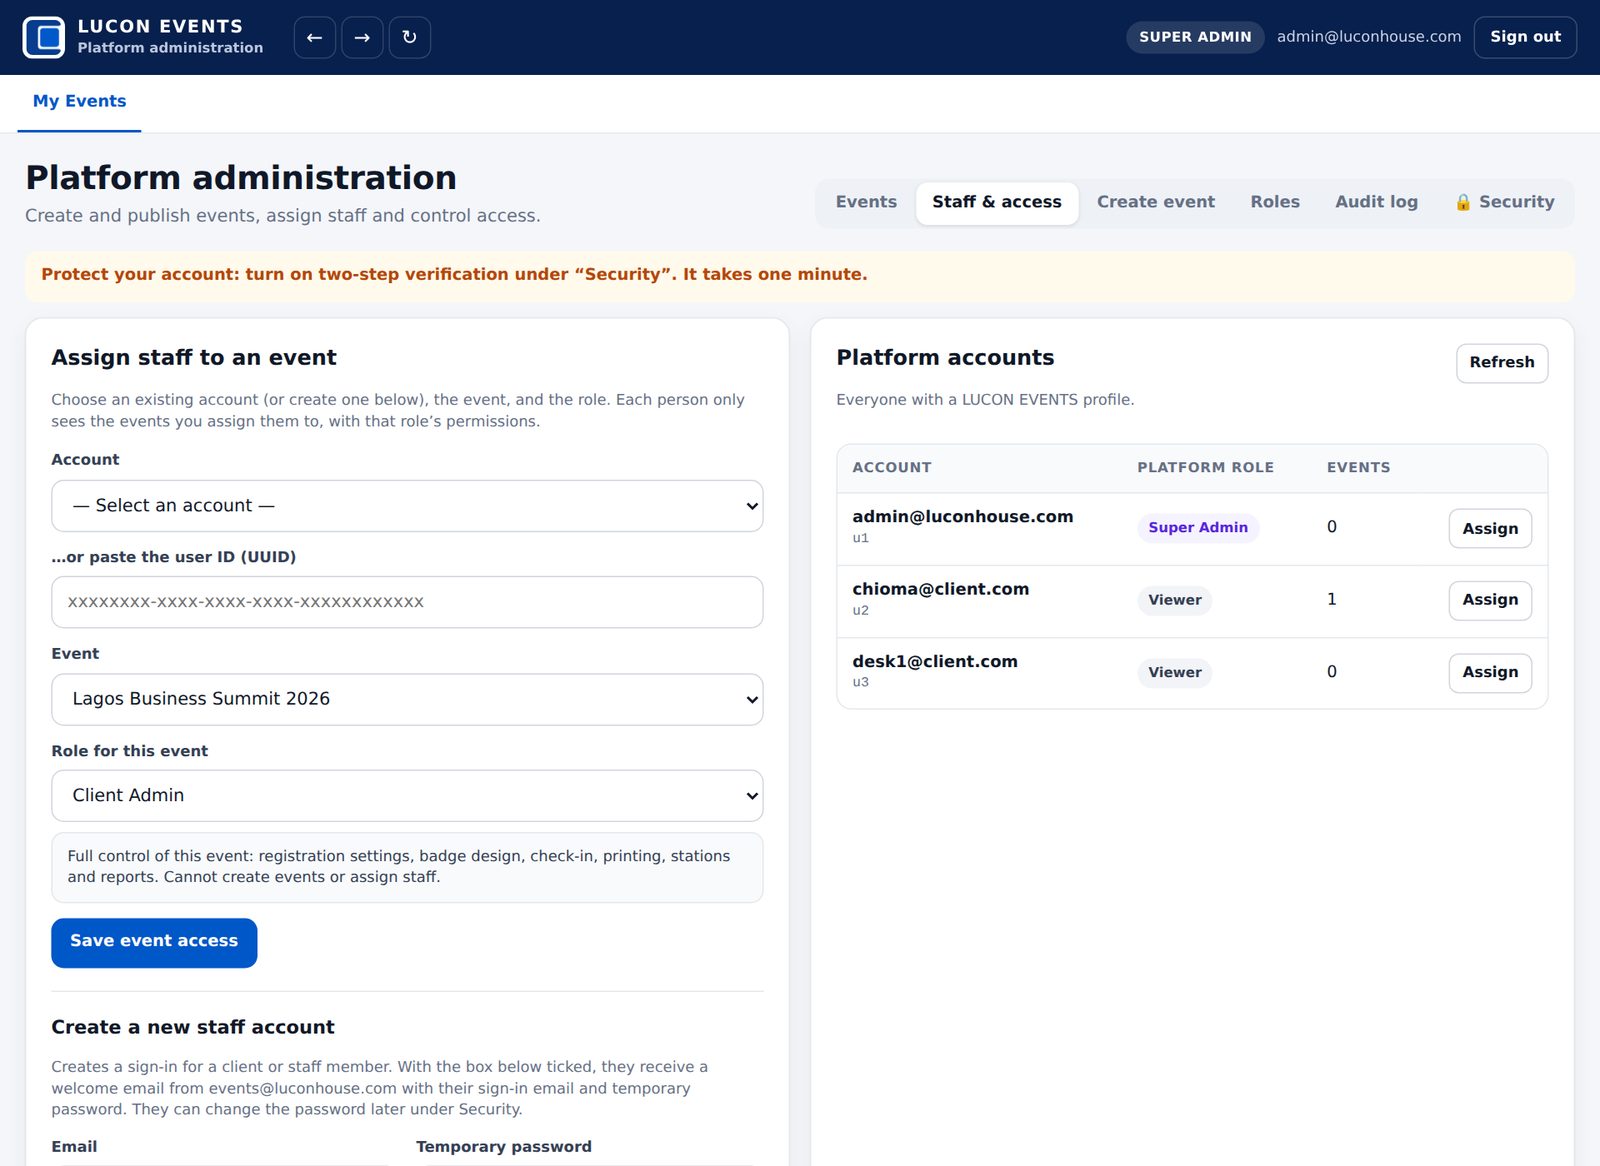
- Open the Staff & access tab.
- Under Create a new staff account, type their email. Click Generate password or type one (at least 8 characters).
- Leave Email the login details to this person ticked, then click Create account & select it. They get a welcome email with a Confirm my account button, their email and their temporary password.
- Above, under Assign staff to an event, choose the event and the role (Client Admin, Registration Staff or Viewer), then click Save event access.
Set up an event
For the Client Admin and the Super Admin
Open the event from My Events. The menu across the top is the event’s workspace. Work through Setup → Event Settings first (registration, branding and colours), then the badge, agenda, meals and sponsors.
Find your way: the menu
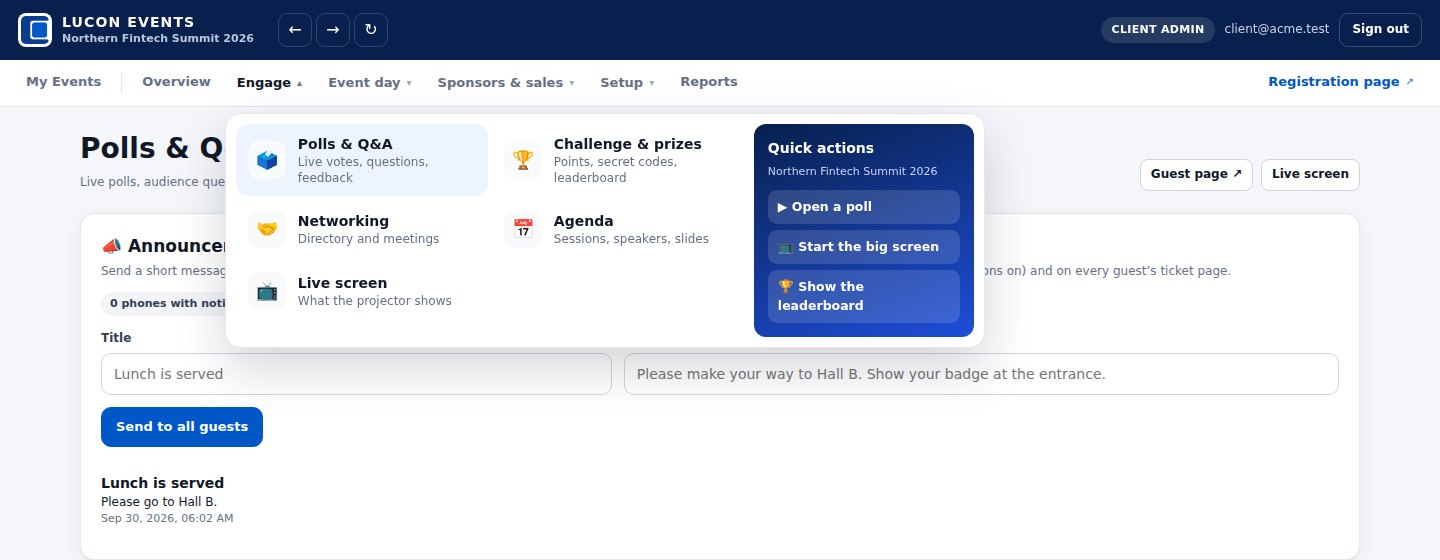
Pages are grouped into six short menus. Click a menu name (for example Engage ▾) to open its panel, then click a page. Press Esc or click anywhere else to close it. On a phone, the panel opens as a list.
| Menu | Pages inside |
|---|---|
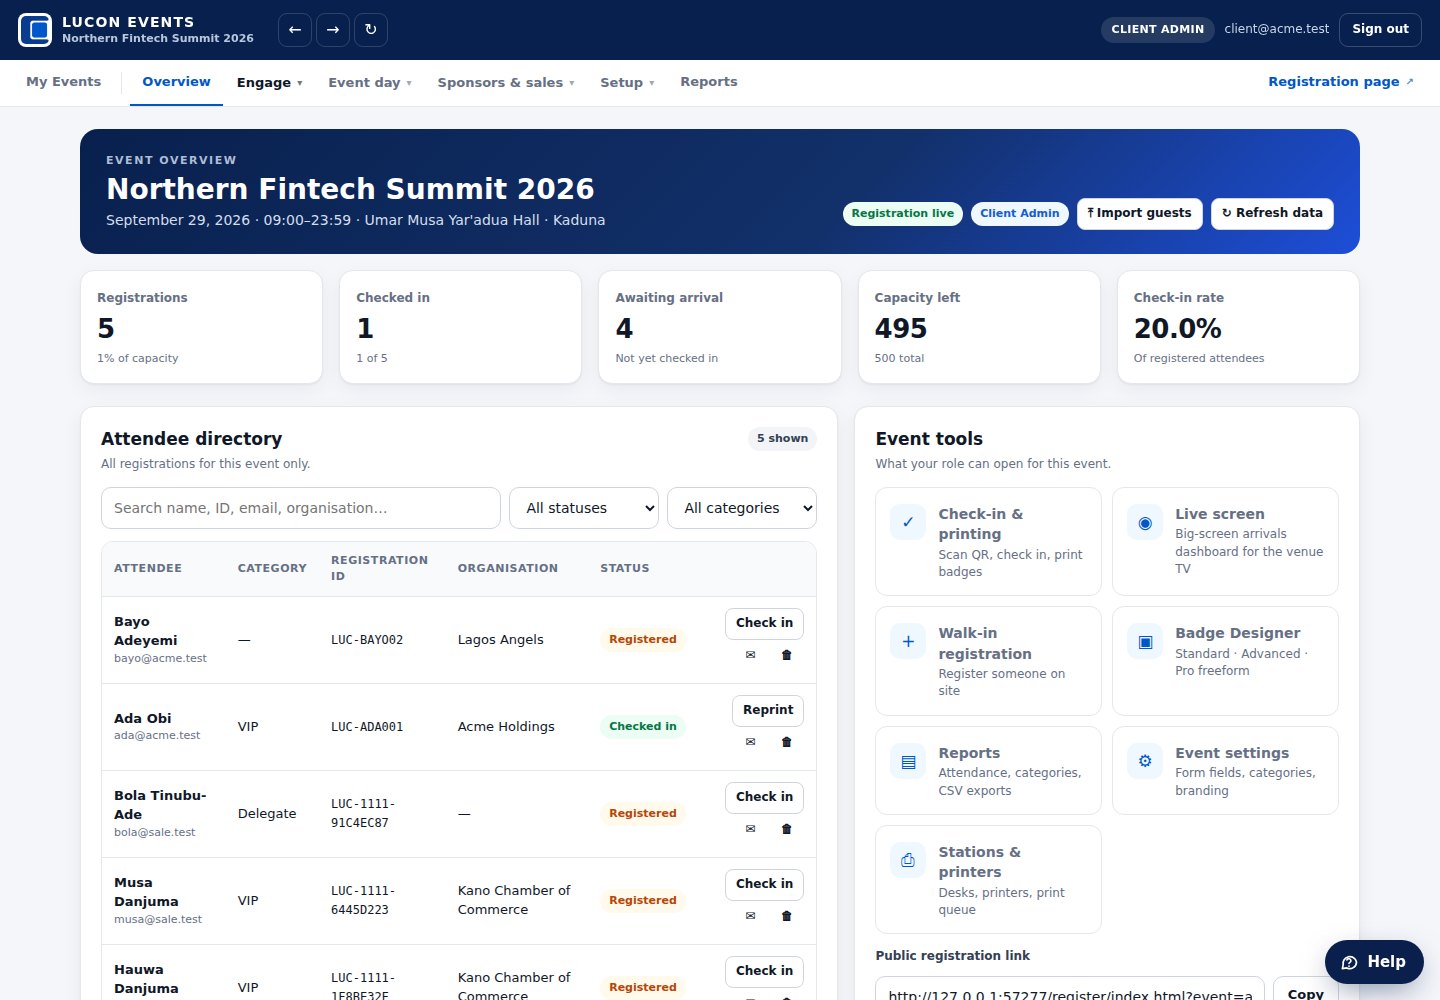
| Overview | Numbers at a glance, the guest list, approvals, import guests |
| Engage | Polls & Q&A · Challenge & prizes · Networking · Agenda (with slides) · Live screen |
| Event day | Check-in & Printing · Meals & access · Stations & Printers · Lucon Studio |
| Sponsors & sales | Tickets & sales · Sponsors & leads (booth links, reports, paid banners) |
| Setup | Event Settings (registration, branding & colour theme) · Badge Designer |
| Reports | Exports, client report, certificates & CPD |
The dark box on the right of some panels holds Quick actions for event day, for example ▶ Open a poll or ✅ Open the check-in desk. Registration page ↗ on the far right opens the public form in a new tab.
Registration form
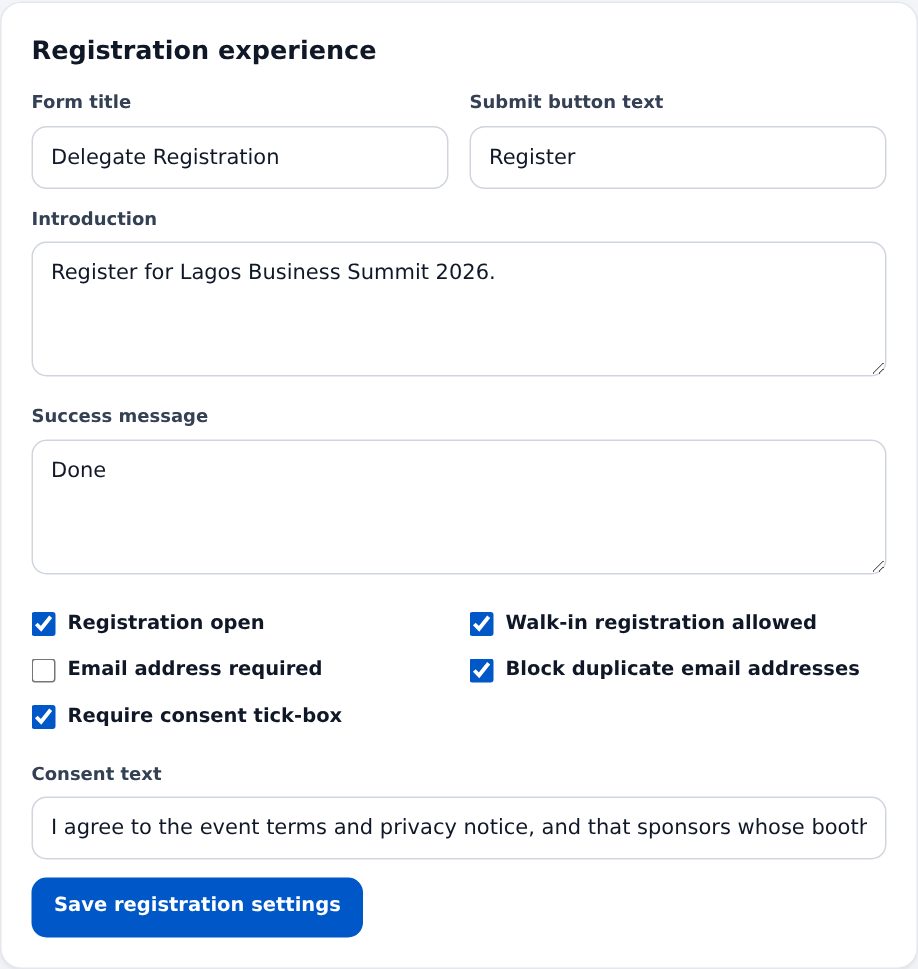
In Event Settings → Registration experience, set the form title, the welcome text and the message guests see after registering.
- Registration open: untick it to close the public form. Desk staff can still register walk-ins if Walk-in registration allowed is ticked.
- Require consent tick-box: guests must agree before registering. Use this text so sponsors may receive contact details: “I agree to the event terms and privacy notice, and that sponsors whose booth I visit may receive my name, organisation and contact details.”
- Block duplicate email addresses: one registration per email.
Share the registration link
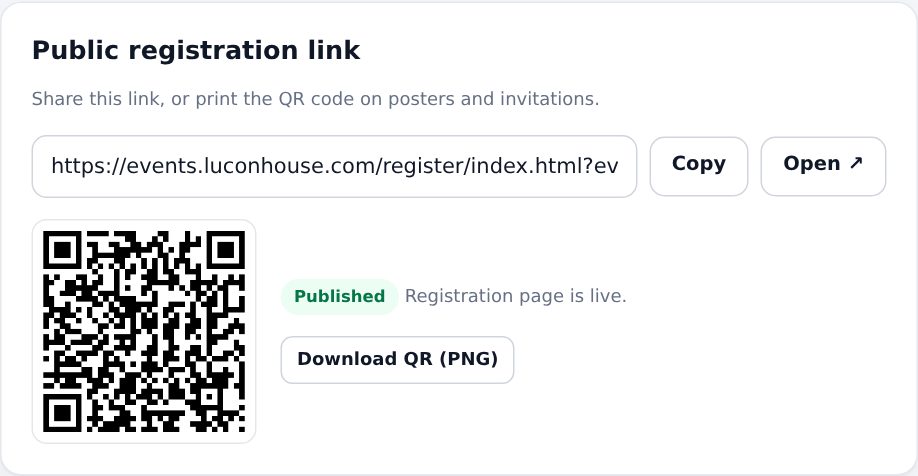
Public registration link shows the link and a QR code. Click Copy to paste the link into WhatsApp, email or social media, or Download QR (PNG) to print it on posters and invitations.
Categories, prices and staff-only categories
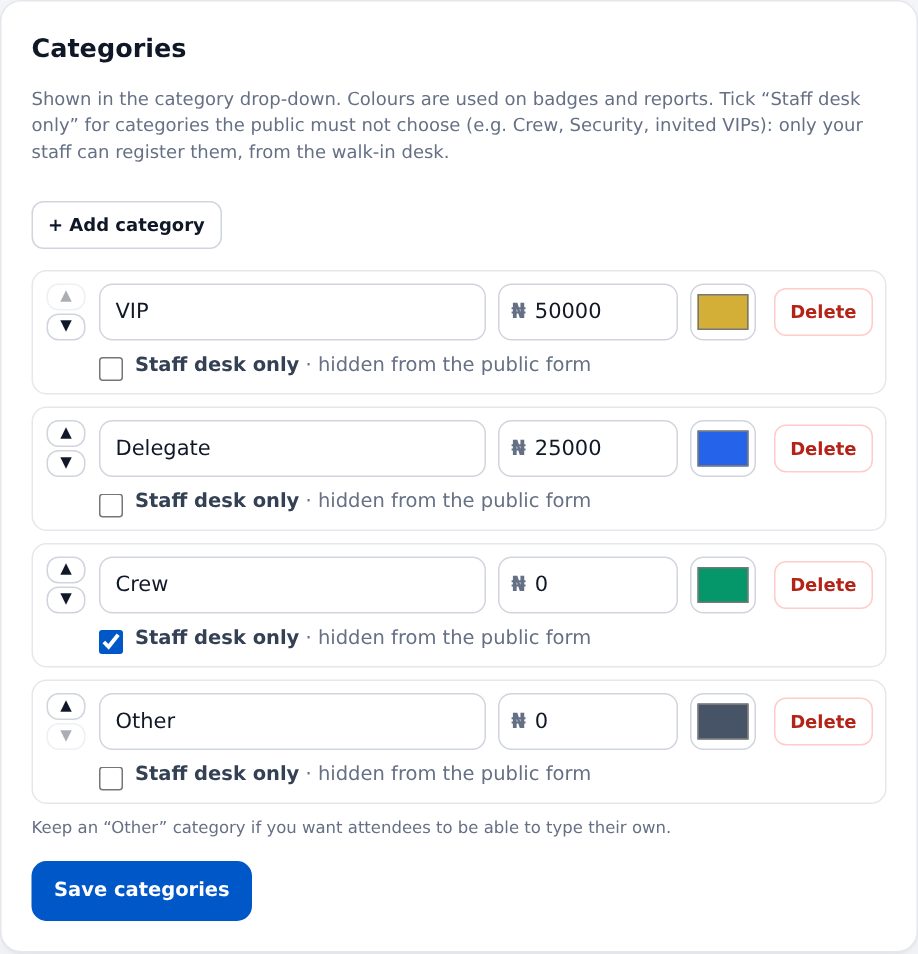
- In Categories, add or rename categories and pick a colour for each one. The colour appears on badges and reports.
- Type a price in Naira for paid categories. 0 means free.
- Tick Staff desk only for categories the public must not choose, such as Crew, Security or invited VIPs. They disappear from the public form, and only your staff can register guests in them.
- Click Save categories.
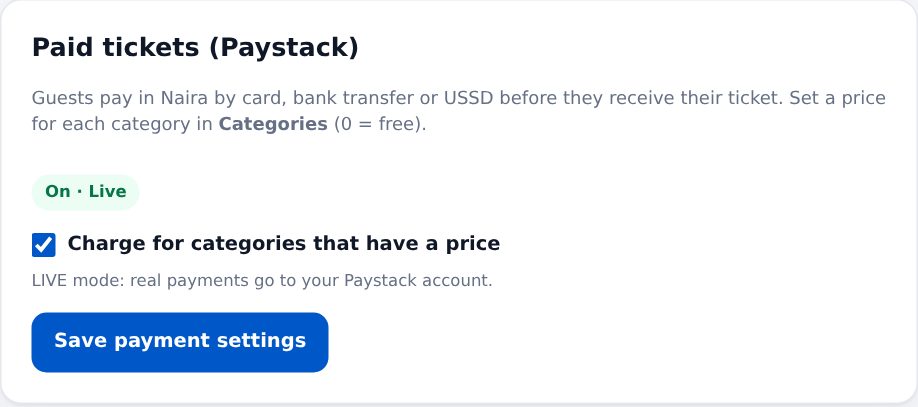
Paid tickets (Paystack)
In Paid tickets, tick Charge for categories that have a price and save. The pill should say On · Live. Guests then pay by card, bank transfer or USSD before they receive their ticket.
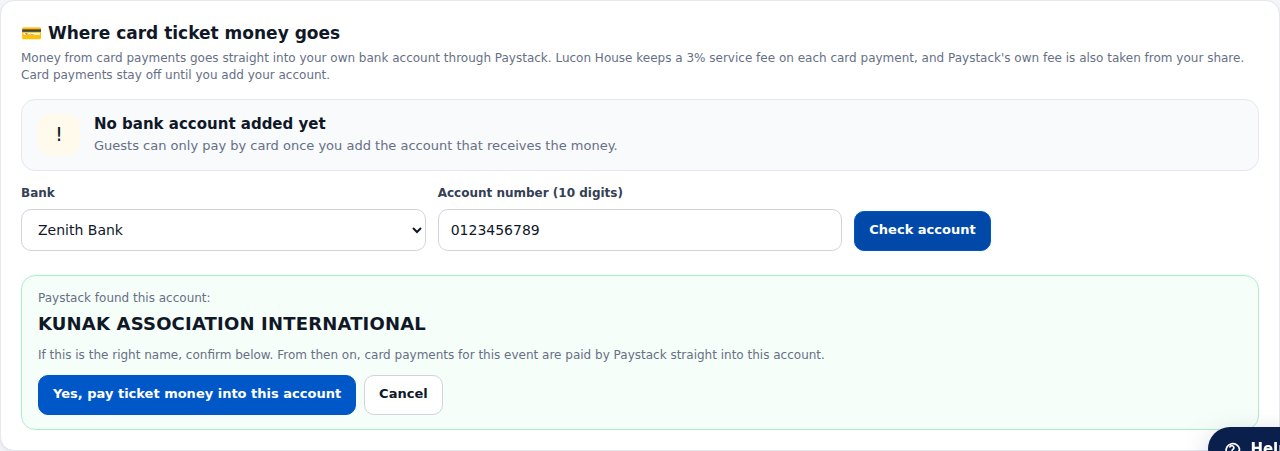
Where card ticket money goes
- Open Sponsors & sales ▾ → Tickets & sales. The first card is Where card ticket money goes.
- Choose the bank, type the 10-digit account number and click Check account. Paystack shows the account holder’s name.
- If the name is right, click Yes, pay ticket money into this account. Only the last four digits are shown after saving.
From then on, Paystack pays every card payment for the event straight into that account. Lucon House keeps its service fee (the percentage shown on the page) and Paystack’s own fee comes out of the organiser’s share. The card shows the card sales, the Lucon House fee and what the organiser receives.
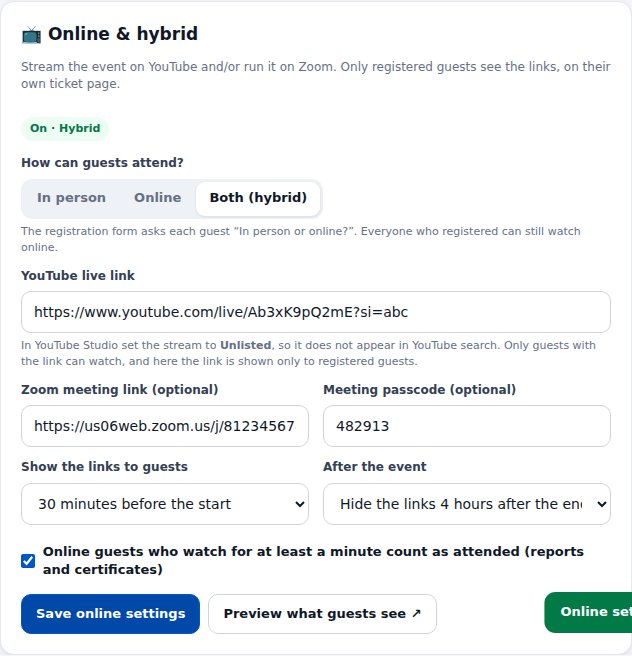
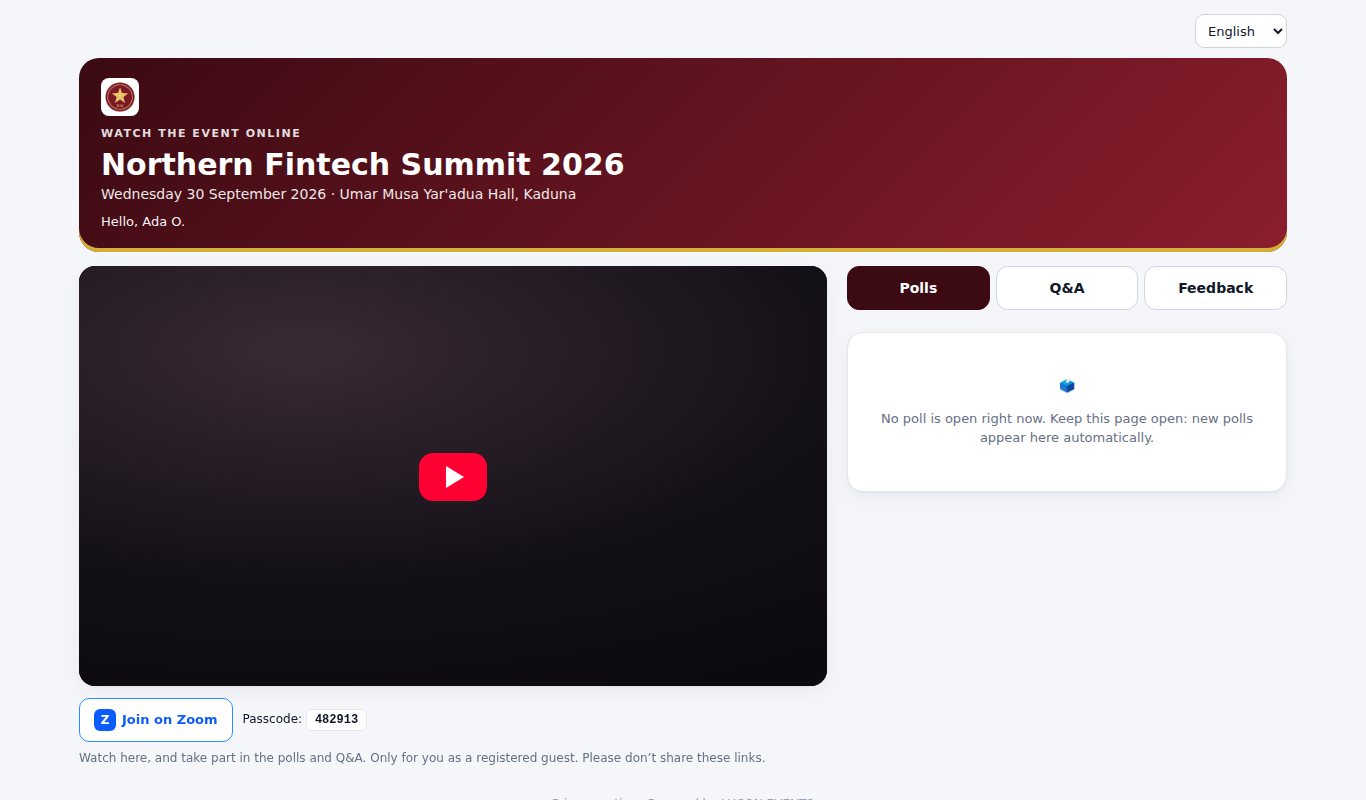
Online & hybrid events (YouTube and Zoom)
- In YouTube Studio, create your live stream and set it to Unlisted. Copy its link. In Zoom, copy the meeting link and passcode.
- Open Setup ▾ → Event Settings → 📺 Online & hybrid. Choose Online or Both (hybrid), paste the links and choose when guests can see them.
- Click Save online settings, then Preview what guests see ↗.
Registered guests get a Watch the event online card on their ticket page with ▶ Watch live and Join on Zoom. The watch page shows the video with Polls, Q&A and Feedback beside it. On hybrid events the registration form asks each guest “In person or online?”. Guests who watch for a minute, or tap Join on Zoom, count as attended online (Reports → 📺 Online attendance).
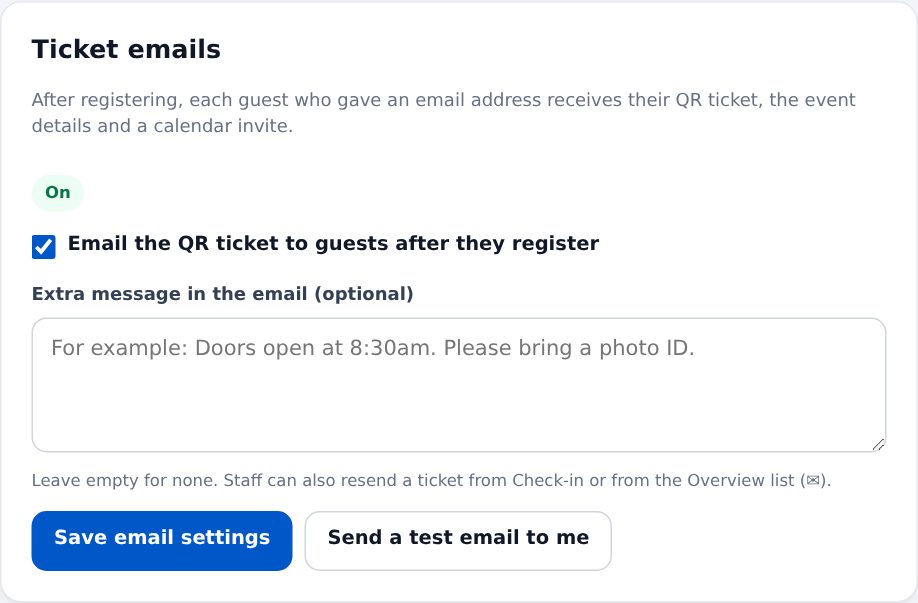
Ticket emails and invite-only approvals
- Ticket emails: every guest with an email address gets their QR ticket, the event details and a calendar invite. Add an optional line such as “Doors open at 8:30am. Bring a photo ID.” Click Send a test email to me to see it.
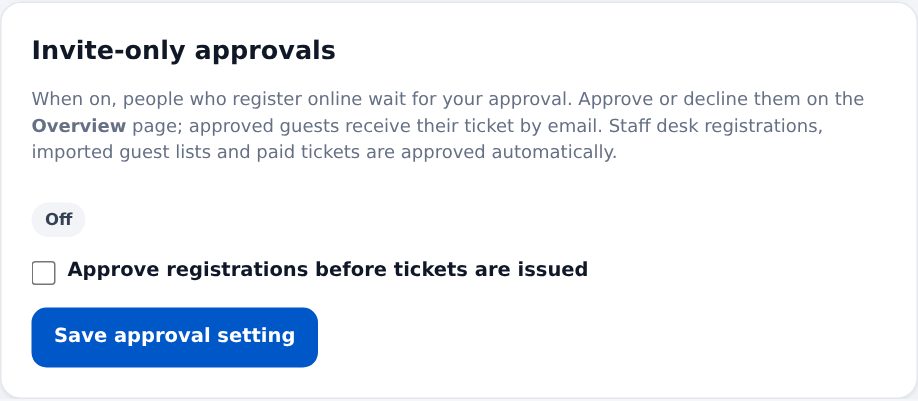
- Invite-only approvals: when this is on, people who register online wait for your decision. Approve or decline them on the Overview page. Approved guests receive their ticket automatically.
Branding, logo and colour theme
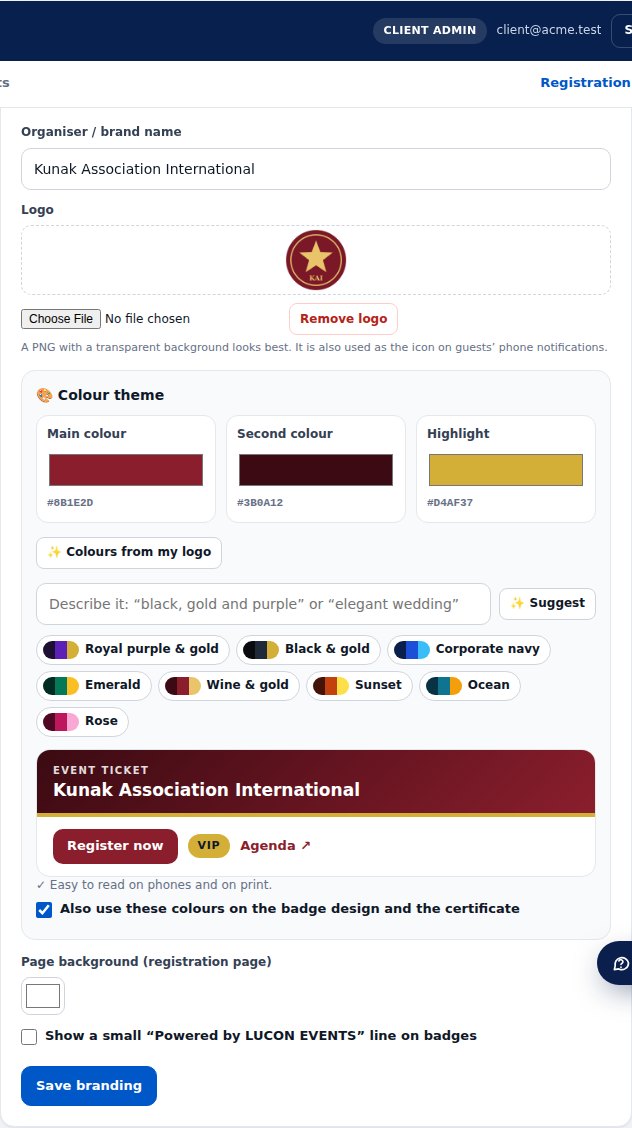
Everything guests see carries the organiser’s name, logo and colours: the registration page, ticket page and emails, badges, certificates, the agenda, networking and challenge pages, the kiosk and the big screen. Lucon House only appears as a small “Powered by LUCON EVENTS” line.
- Open Setup → Event Settings and find Branding & colour theme.
- Type the organiser / brand name (for example “Kunak Association International”) and upload the logo. A PNG with a transparent background looks best.
- Choose the colours in one of three ways:
- ✨ Colours from my logo: the site reads the main colours of the logo you uploaded.
- Type a description such as “black, gold and purple” or “elegant wedding” and click ✨ Suggest. The AI suggests a matching theme (if the AI is busy, the site still understands colour names).
- Click a ready-made theme (Royal purple & gold, Black & gold, Corporate navy, Emerald, Wine & gold…), or pick each colour by hand.
- Check the preview: ticket header, button, category label and link. The site keeps text easy to read automatically; a light colour such as gold is used a little deeper behind white text.
- Leave Also use these colours on the badge design and the certificate ticked, then click Save branding.
The three colours: Main colour (buttons, headers), Second colour (deep backgrounds and gradients) and Highlight (thin lines, seals, category labels). Guests see the new colours the next time they open or refresh a page.
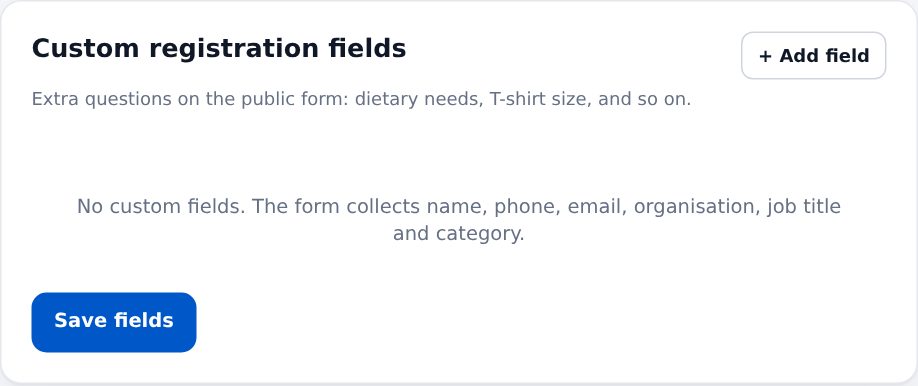
Custom registration fields adds extra questions to the form, for example dietary needs or T-shirt size.
Design the badge
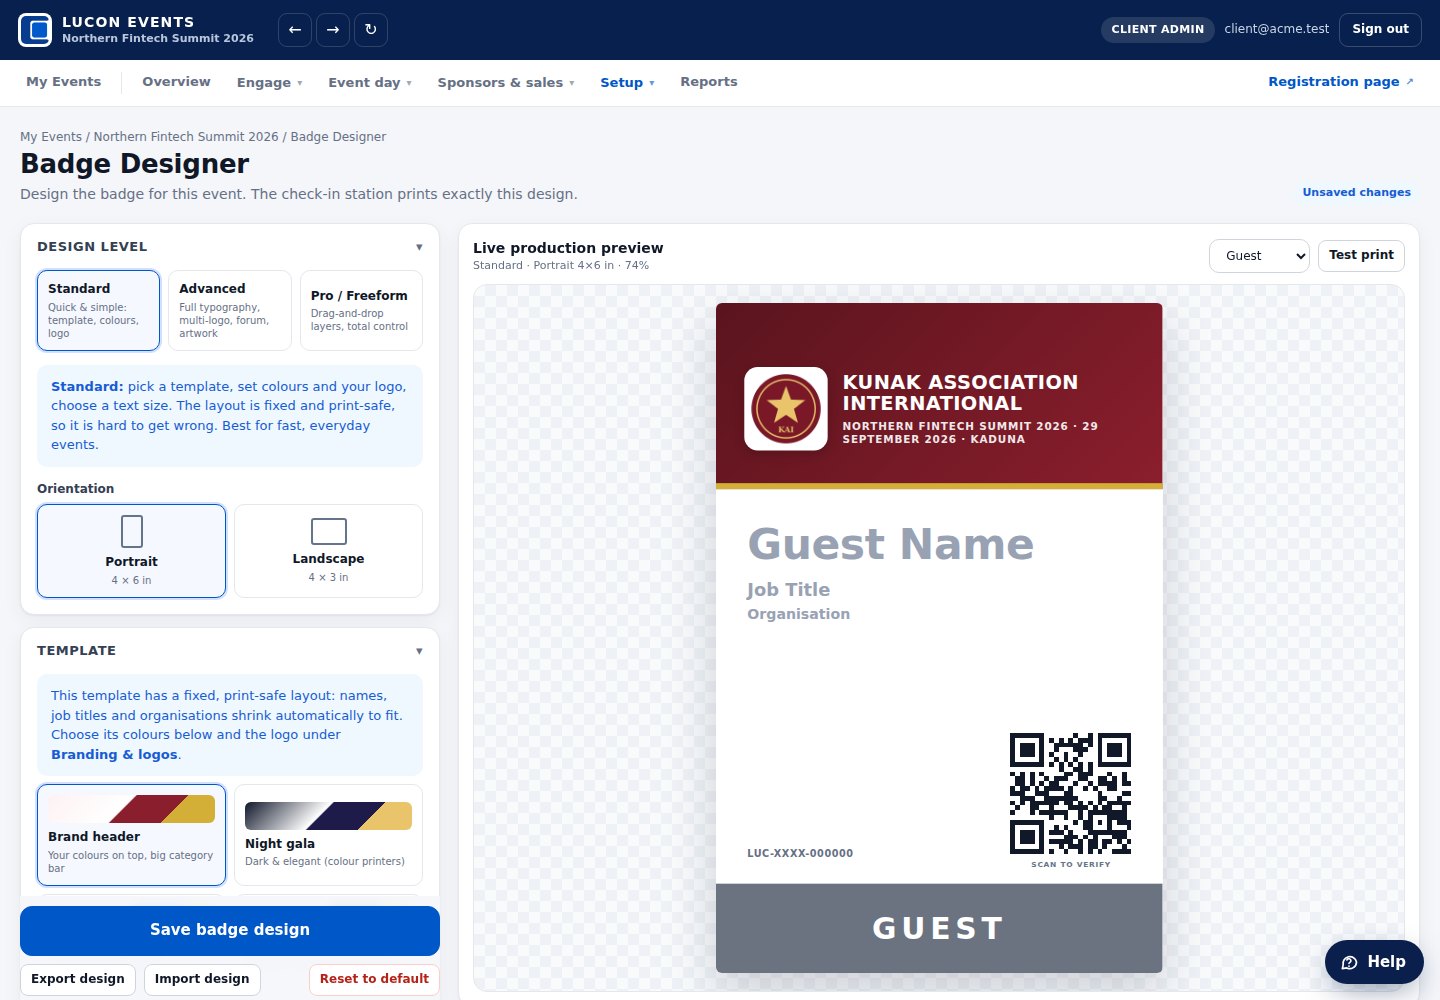
- Open Setup → Badge Designer. A new design starts in the organiser’s colours with their logo and name.
- Choose a size (portrait 4×6 in or landscape 4×3 in) and a template:
- Brand header: the organiser’s colours and logo on top, and a big coloured category bar at the bottom so staff can see VIP, Speaker or Delegate from a distance.
- Night gala: dark and elegant, for dinners and galas. Use a colour printer; thermal (Zebra) printers print it in black and white.
- Classic corporate, Executive, Conference, Institutional, Lifestyle, Development, and Forum (Advanced level).
- The preview uses a neutral sample, Guest Name / Job Title / Organisation, shown in grey so it is clearly a placeholder. Type a real name under Preview attendee to test a long name: long names shrink to fit on up to two lines.
- Change colours, text sizes, the logo and the tags. Tick “Powered by LUCON EVENTS” in Event Settings only if you want that small line.
- Click Save badge design. Every check-in desk then prints the same design. Click Test print to check the size on your printer.
Agenda: sessions and speakers
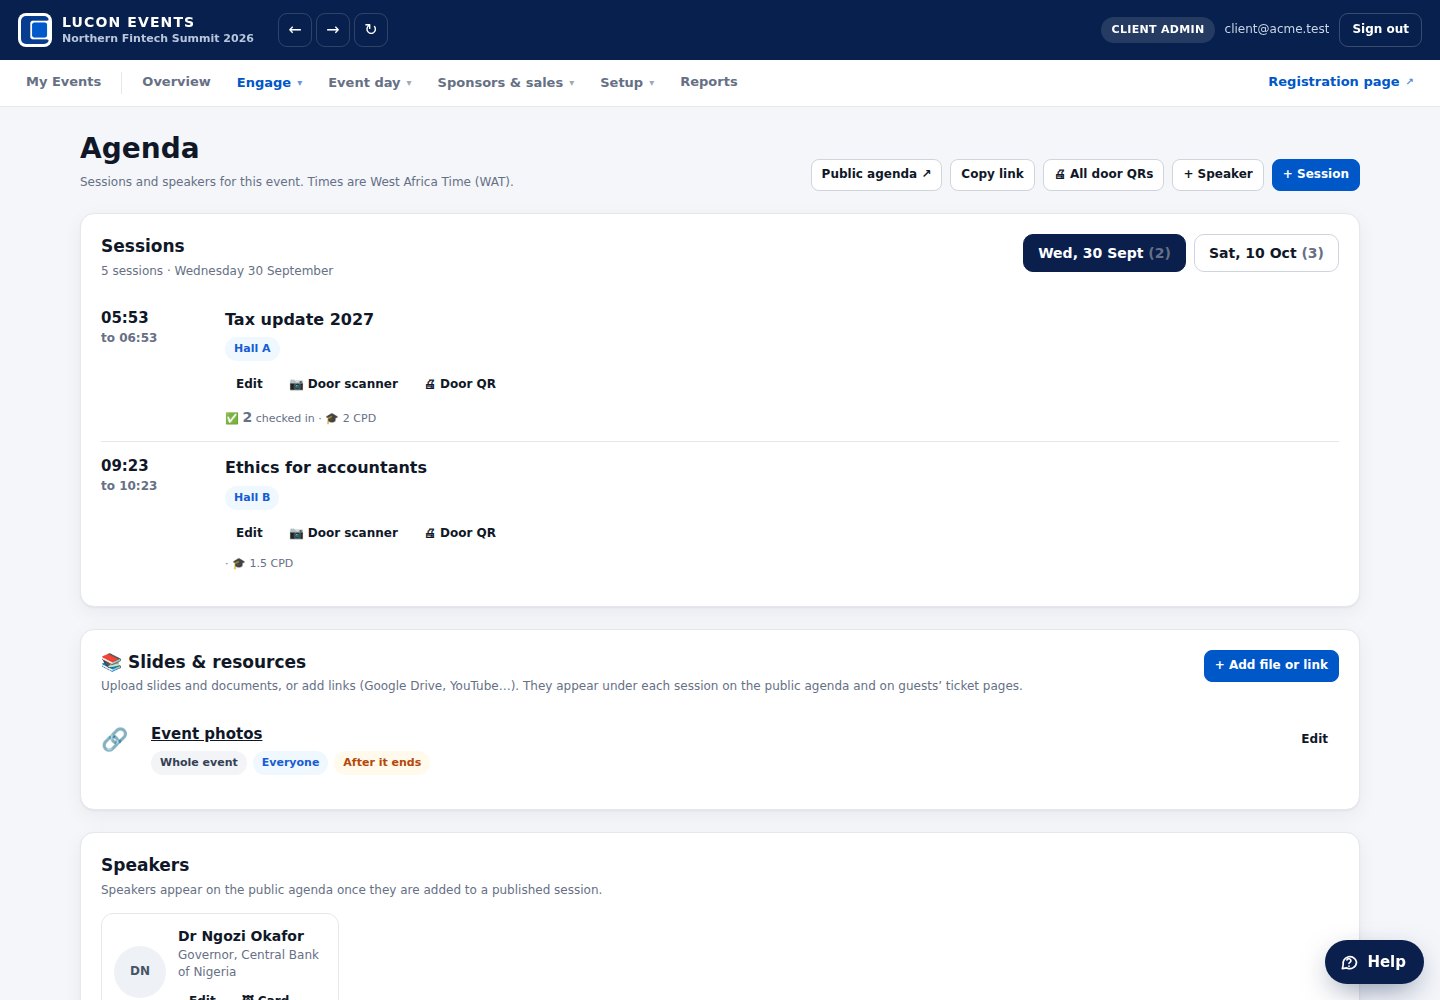
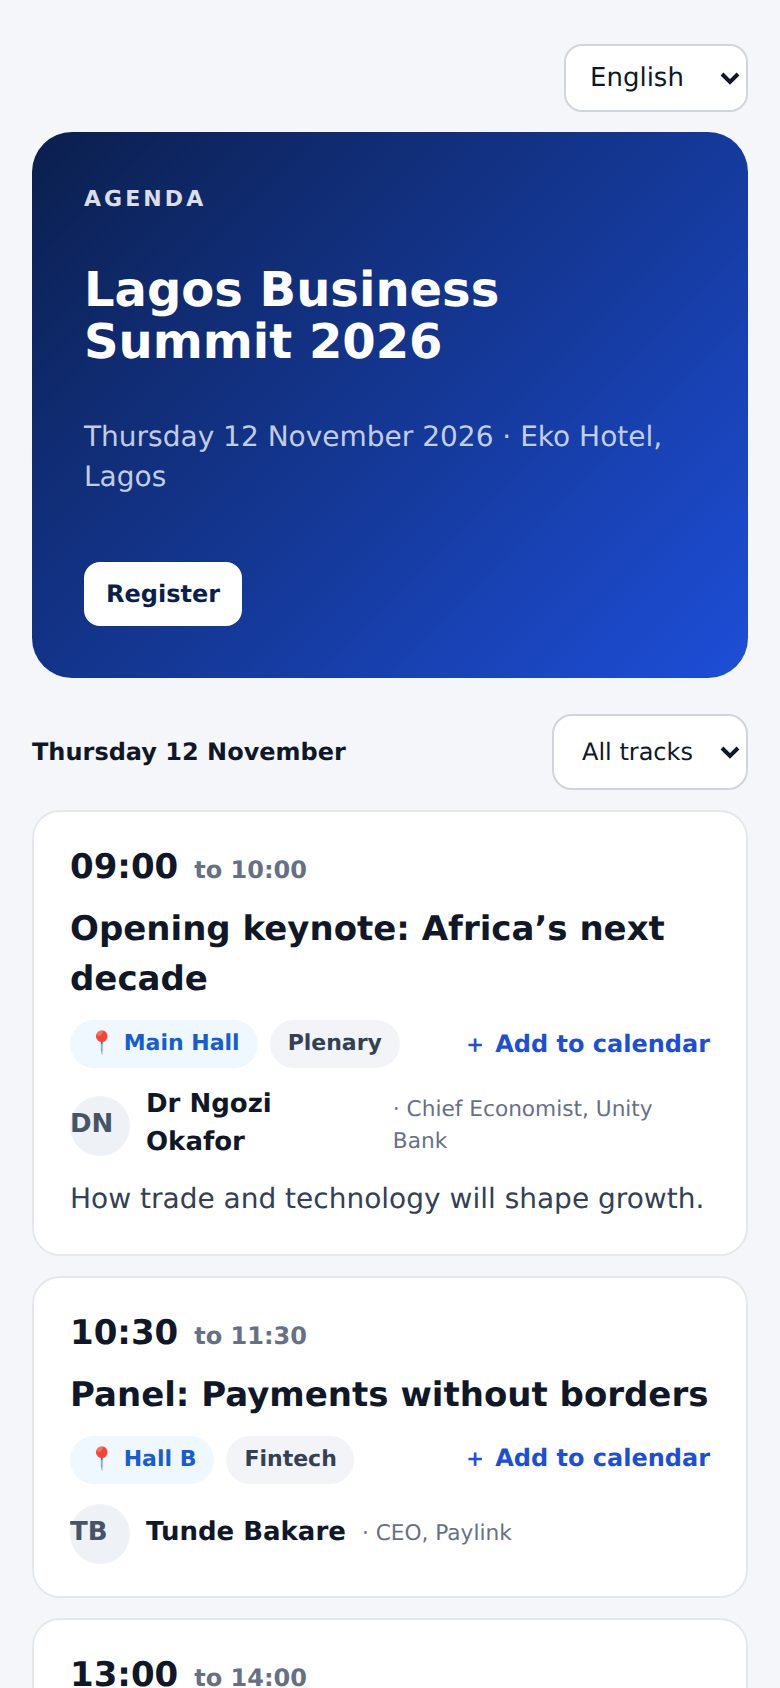
- Open Agenda. Click + Speaker to add each speaker with title, organisation, photo and a short bio.
- Click + Session and fill in the title, start and end time, room, track and speakers.
- Click Copy link to share the public agenda. Guests also see an Agenda button on their ticket and registration page.
Organiser self-service (Super Admin)
- Organisers create their own account and event at events.luconhouse.com/start. Free events (up to the free limit) come to you straight away; bigger events come after the organiser pays online.
- Open Admin → Organisers. Check the event, the organiser's details and the registration page, then click ✓ Approve & publish or Ask for a change (type what they should fix). The organiser is emailed either way.
- Set your prices in the same tab under Prices: the free limit and a price for each event size. Untick “Accept new organiser sign-ups” to pause the /start/ page.
- Use Pause organiser to stop someone creating new events. Their existing events are not changed.
Sponsors: questions, reports and ticket-page listing
- In Sponsors & leads, edit a sponsor to add its level, logo, website and a short description. Tick Show this sponsor on guests' ticket pages so guests can tap Send my details.
- Sponsors set their own ⚙ My questions on their booth link (for example “What are you interested in?”). The answers are recorded on every lead.
- After the event, click 📄 Report next to each sponsor (or the sponsor opens it from their booth page) and save it as a PDF. It is a ready-made results report for the sponsor.
Session check-in and CPD certificates
- In Agenda, edit each session and enter its CPD points (for example 2 for ICAN, NBA or MDCN credits).
- Click 🖨 All door QRs and stick each A4 poster at the door of its session. Guests scan it with their phone camera to check in (from 20 minutes before the session until 20 minutes after it ends).
- At busy doors, staff can also use 📷 Door scanner on a phone to scan badges or tickets. It shows who is in, with Undo and a CSV download.
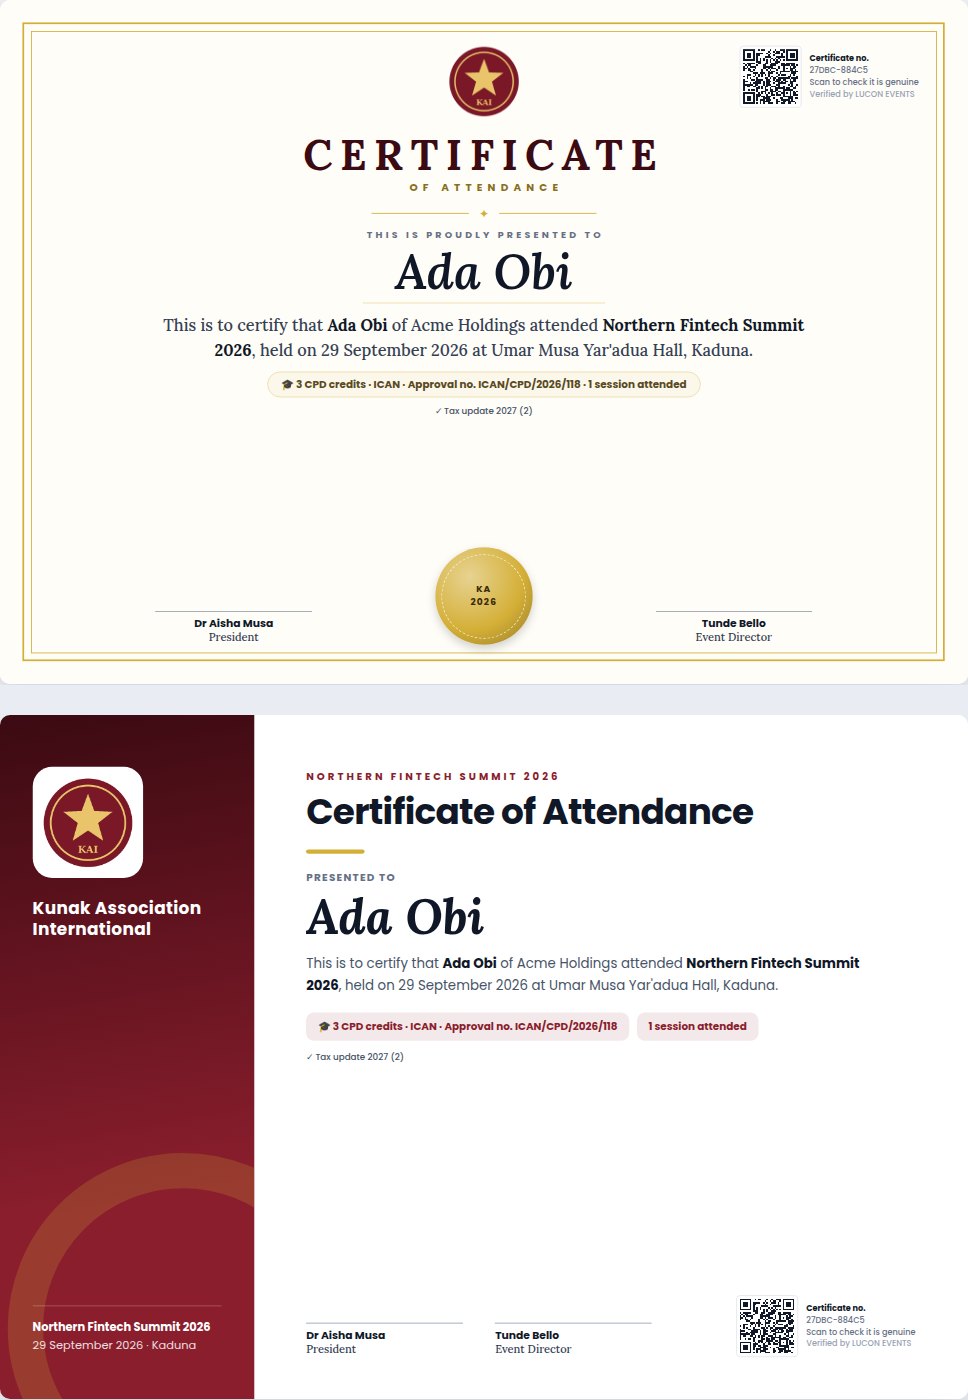
- In Reports → 🎓 Automatic certificates & CPD: switch certificates on and choose the style: Classic (gold frame and seal, for formal events, associations and CPD) or Modern (a side panel in the organiser’s colour, for conferences and summits).
- Fill in the wording, accrediting body and rules. Type up to two signatories (name and title) and, if you like, upload a picture of each signature (sign in black ink on white paper, take a clear photo, crop it tightly). Click Save, then Preview (the preview has no QR code; each guest’s real certificate gets its own number and QR code that anyone can scan to check it is genuine).
- After the event, each qualifying guest finds their certificate on their ticket page. It shows the organiser’s logo, the sessions attended and total CPD points, and has a QR code and certificate number anyone can use to confirm it is genuine.
- To print certificates for everyone at once, click Certificates at the top of Reports, choose the style and who to include, then Create & print.
Meals and zones
In Meals & access, click + Add meal or zone. Examples: “Lunch – Day 1” (one per guest, must be checked in) or “VIP Lounge” (VIP category only, unlimited entries). Chapter 7 shows how to scan.
Printers and desks
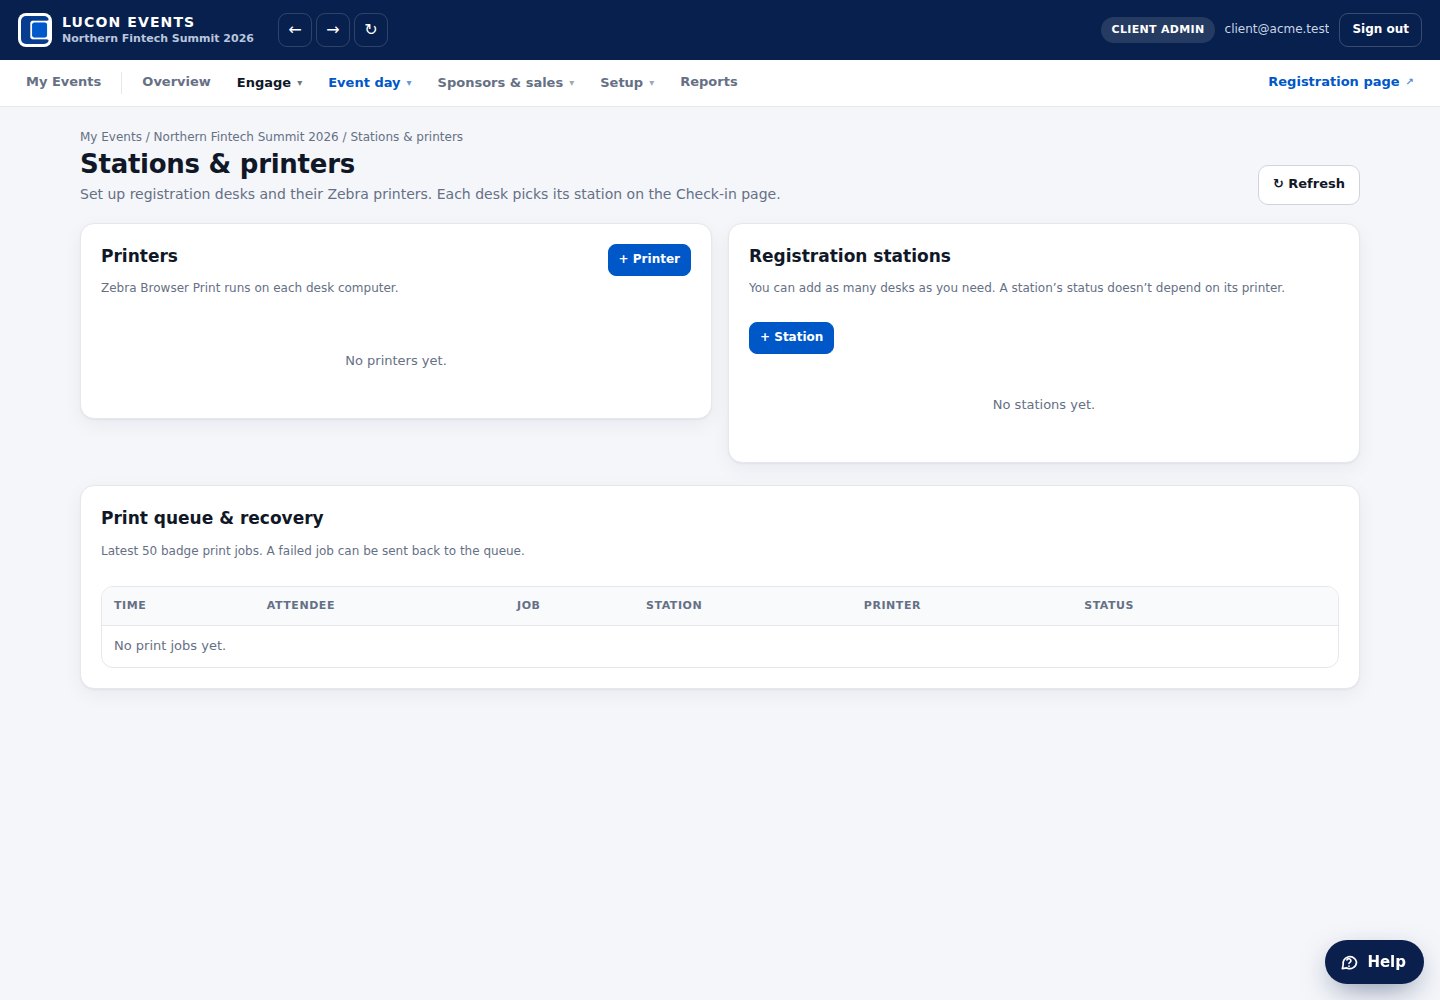
In Stations & Printers, add each check-in desk (“Desk 1”, “Desk 2”) and each printer.
- Ordinary printer (office or label printer): works through the browser. Staff click Print in the print window.
- Zebra badge printer: prints straight away with no print window. Install Zebra Browser Print on each desk computer first.
What guests see
For everyone, so you can help guests
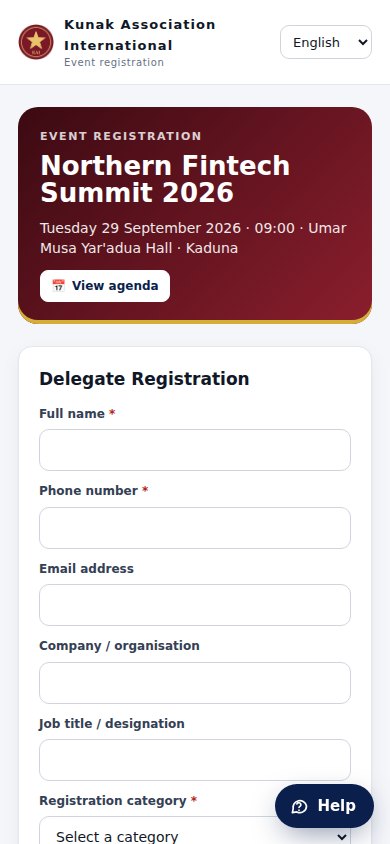
- The guest opens the registration link or scans the poster QR code. They can switch the language at the top: English, Français, Hausa, Yorùbá or Igbo.
- They fill in the form, choose a category and tick the consent box.
- For a paid category, the button says Pay ₦… and register. Paystack opens; after paying they come back to their ticket.
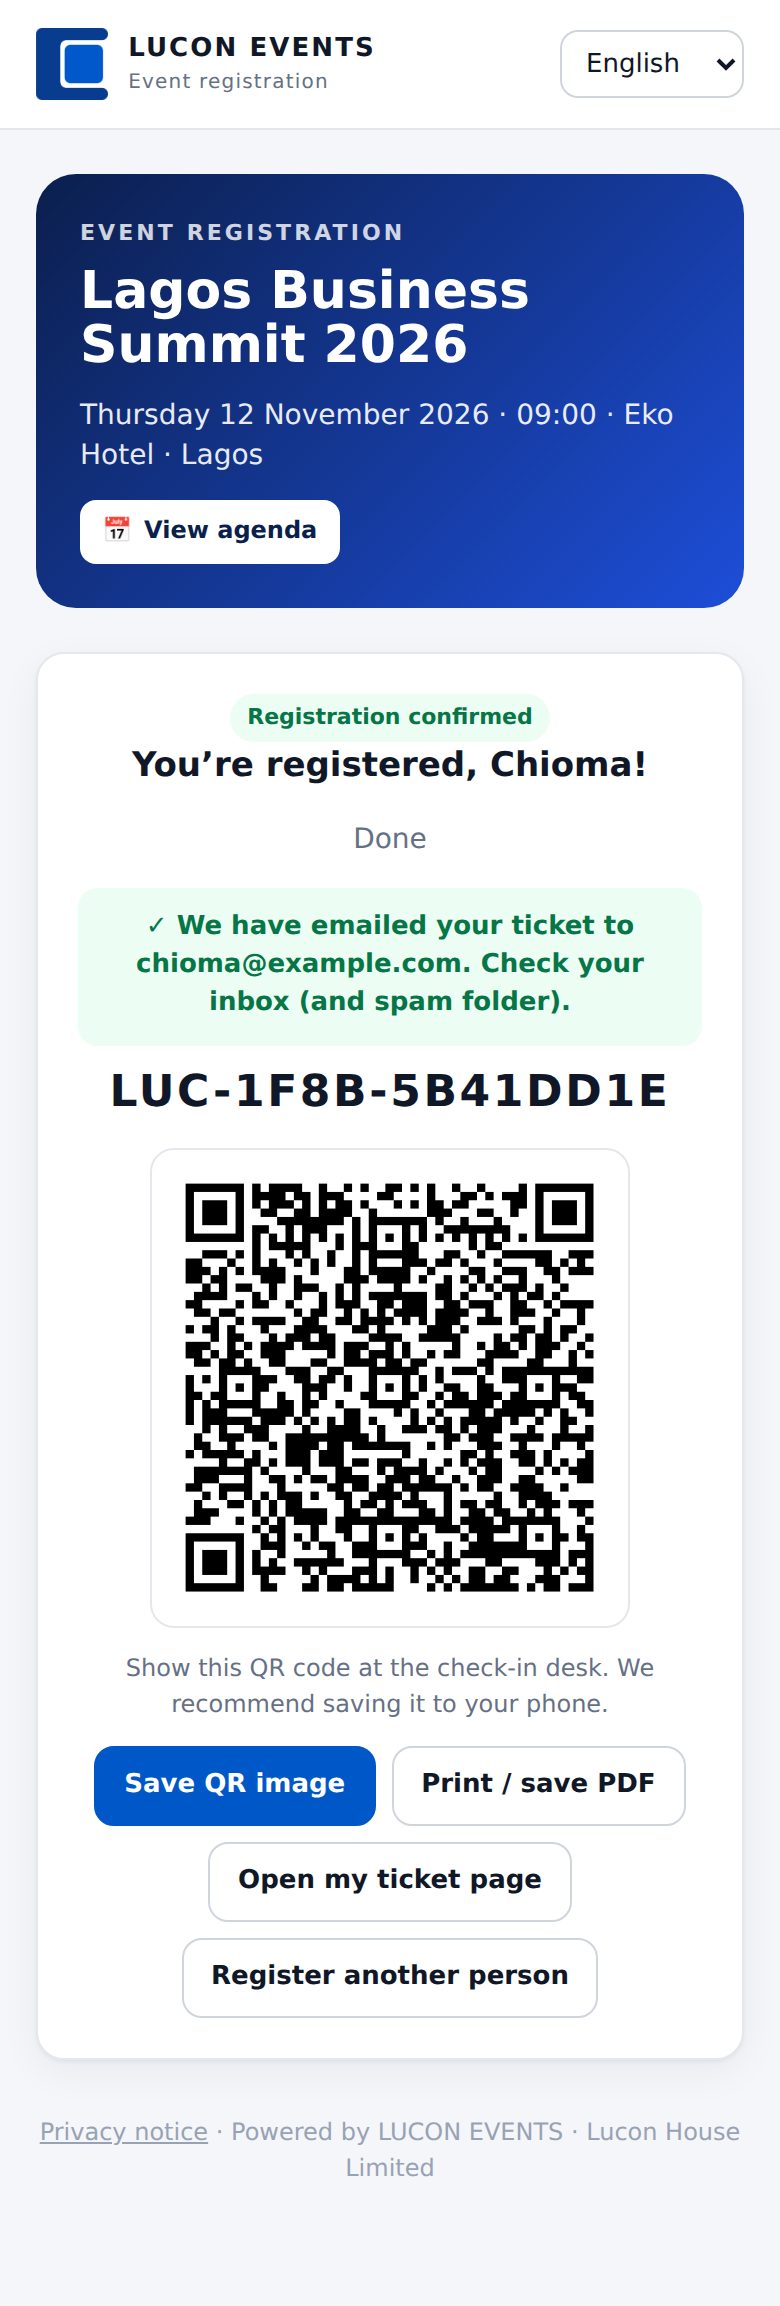
- They see their QR ticket on screen and receive it by email. The email says to check spam if it does not arrive.

Check-in desk
For Registration Staff
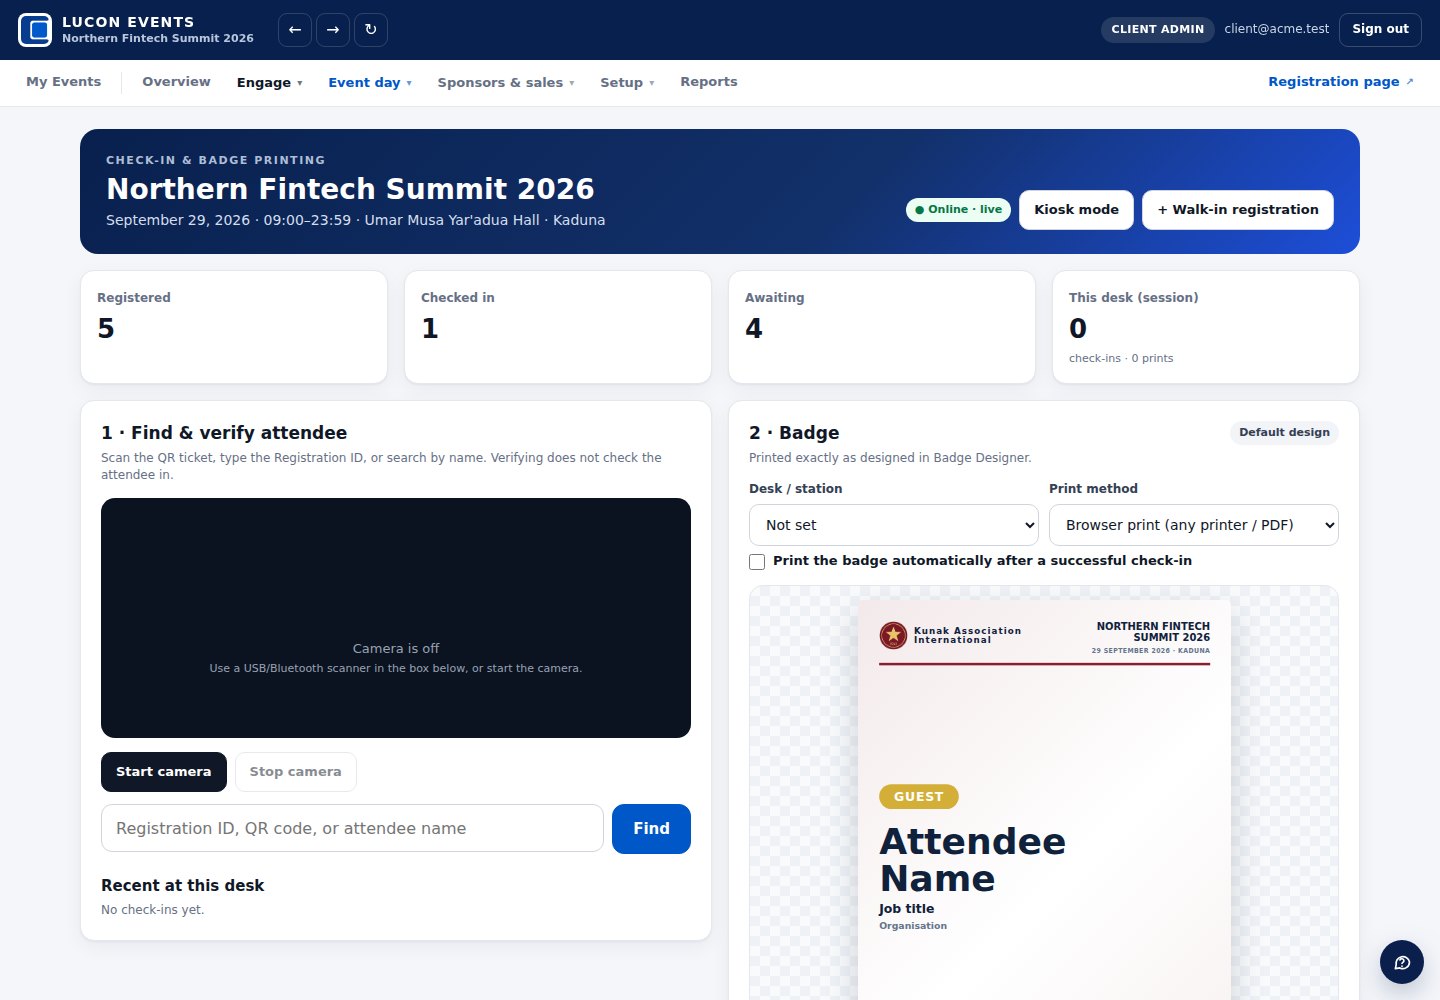
Open the event and click Check-in & Printing. Choose your Desk / station and Print method once at the start of the day.
- Scan the guest’s QR code with a USB scanner (click in the box first), or click Start camera. You can also type the Registration ID or the guest’s name and press Find.
- Check the name, category and organisation with the guest.
- Click the green CHECK IN button.
- Click Print badge, or tick Print the badge automatically after a successful check-in to save a click for every guest.
Other things the desk can do
- Walk-in guests: click + Walk-in registration. The form opens in staff mode, shows staff-only categories, and needs no payment or approval.
- Reprint: find the guest again and click Print badge, or Reprint last.
- Print badges before the doors open: use Batch badge printing at the bottom. Batch printing does not check anyone in.
- Guest awaiting approval or declined: the desk shows a warning and will not check them in until an admin approves them.
Self check-in kiosk
For Registration Staff
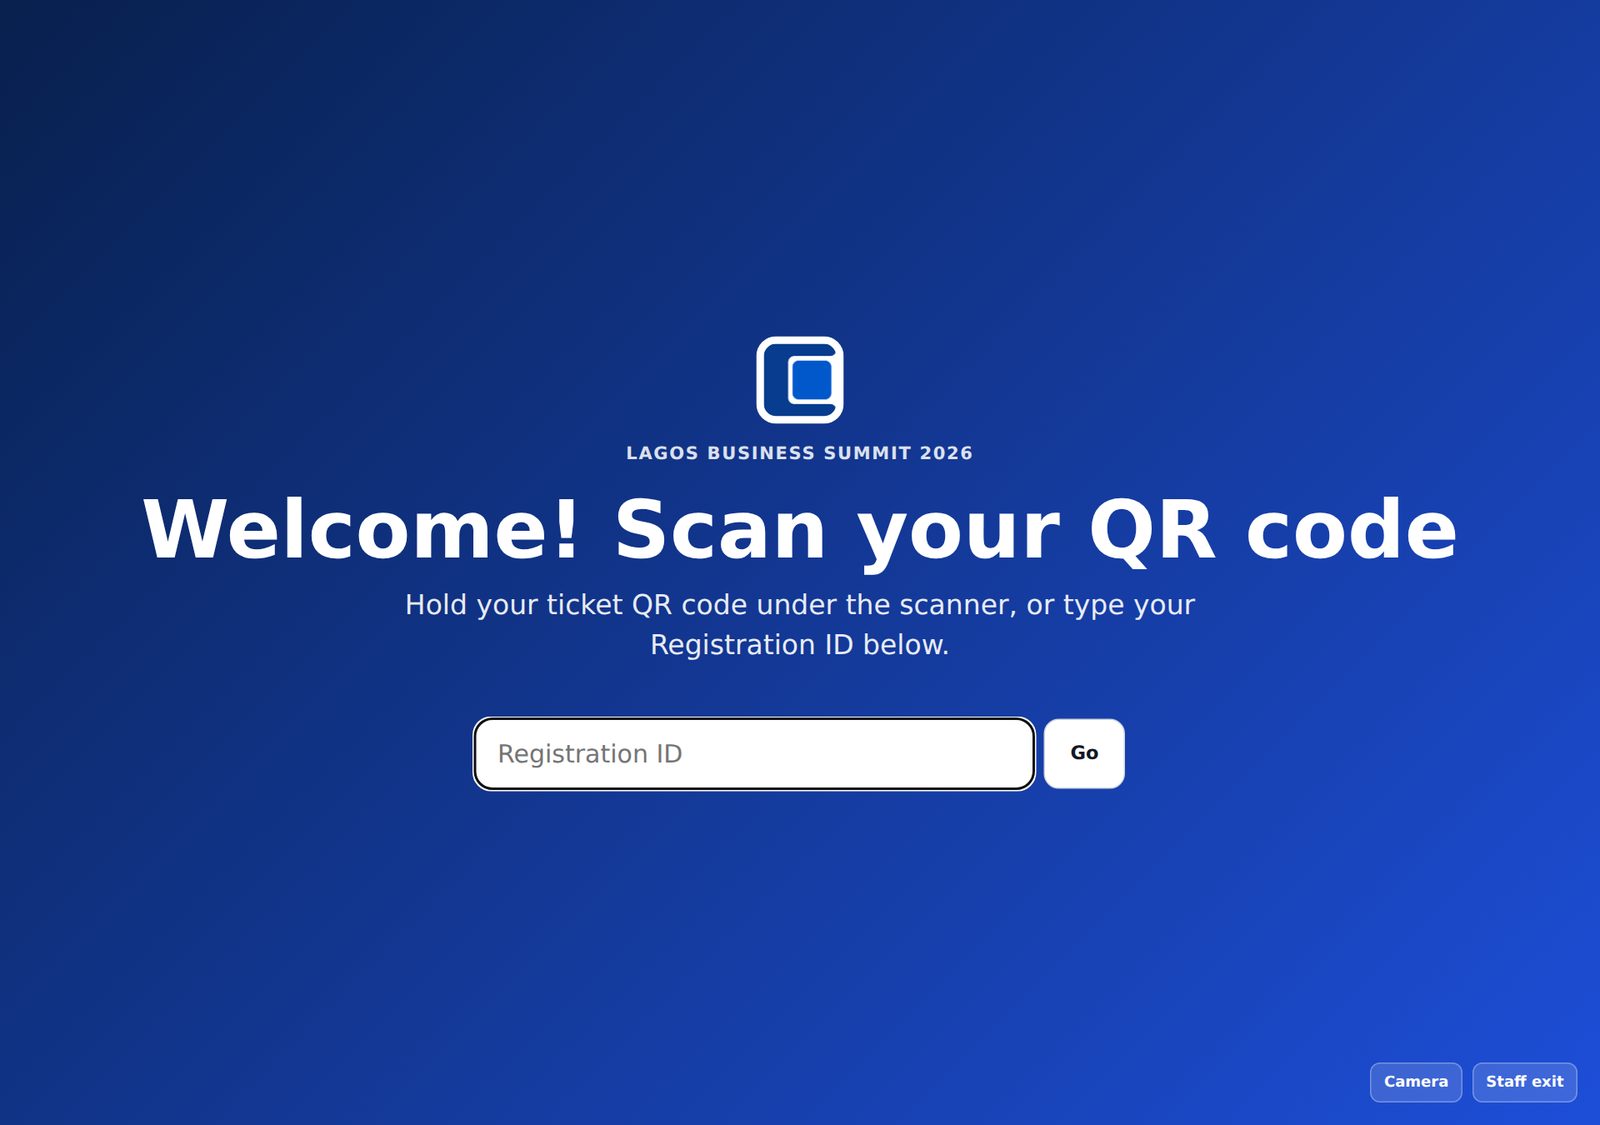
Kiosk mode turns a laptop or tablet into a self-service screen. Guests scan their own QR code, are checked in, and the badge prints.
- Use a separate laptop or tablet just for the kiosk, with a camera or a USB QR scanner, and a printer.
- Sign in, open Check-in & Printing, and choose the desk and print method.
- Click Kiosk mode and choose a staff PIN. The screen goes full-screen.
- Guests scan their QR. The screen says “Welcome, Ada! Your badge is printing”, then resets after a few seconds.
- To leave kiosk mode, click Staff exit and type the PIN.
| Printer at the kiosk | What happens after a scan |
|---|---|
| Zebra badge printer (Print method: Zebra) | Prints straight away. Nobody needs to click anything. |
| Ordinary printer | A print window appears and someone must click Print. |
| Ordinary printer + Chrome in kiosk printing mode | Prints straight away to the computer’s default printer. Ask Lucon House to set this up on the kiosk laptop. |
Meals & doors
For meal servers and door staff (Registration Staff accounts)
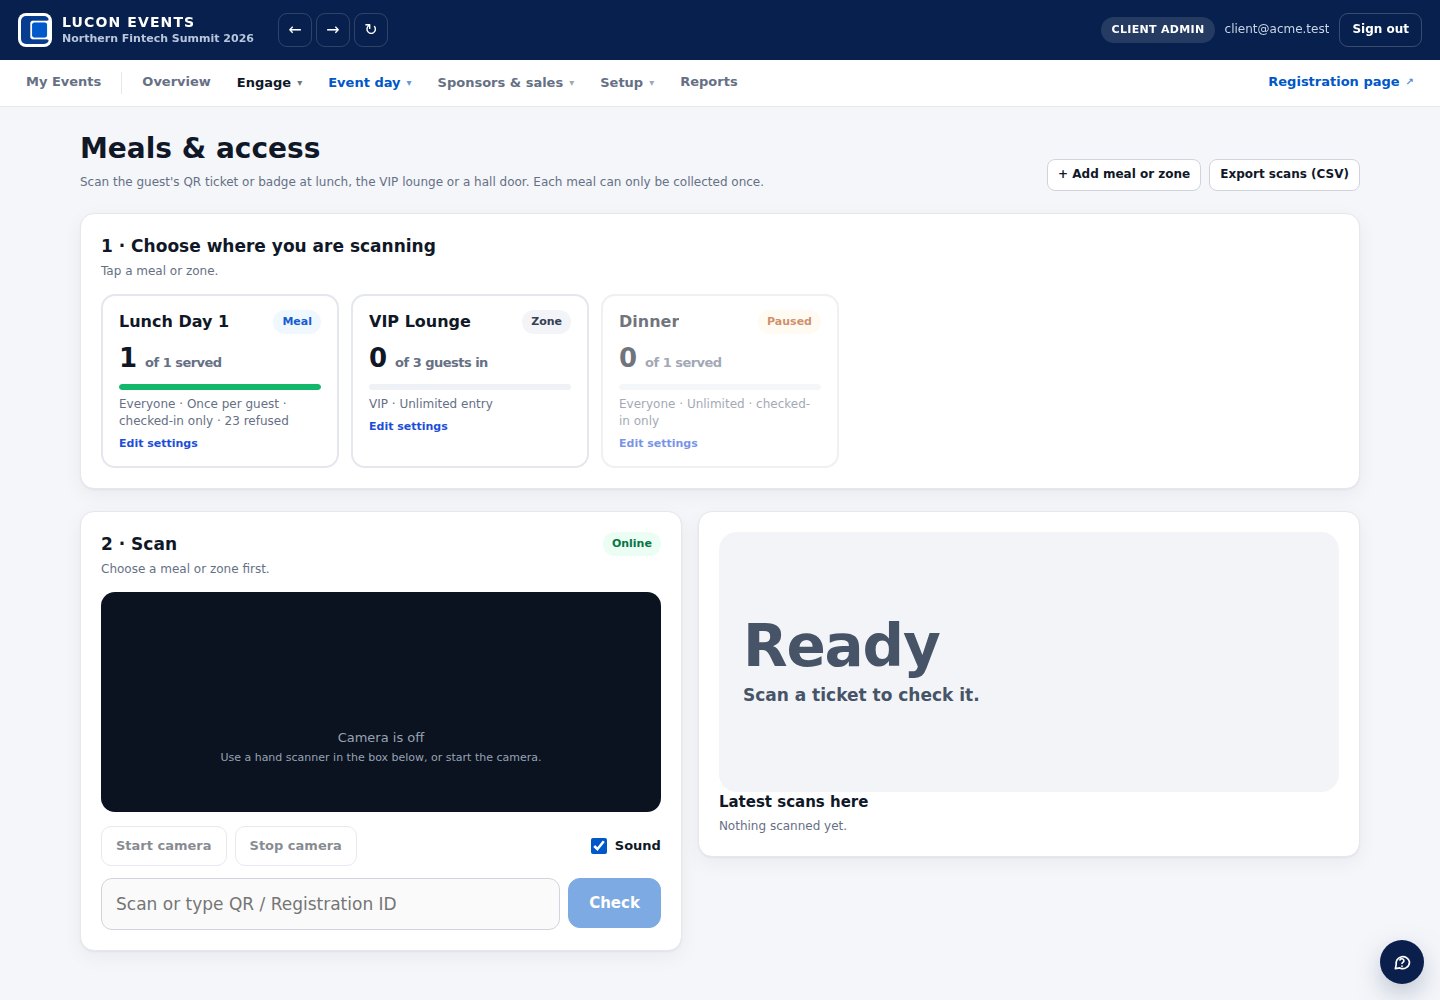
- Sign in on a phone or laptop and open Meals & access.
- Tap the point you are scanning for, for example Lunch – Day 1.
- Tap Start camera and hold each badge QR in the frame, or type the Registration ID and tap Check.
- Green ✓ ALLOWED: serve or let the guest in. Red: read the reason on the screen.
| Red message | What it means |
|---|---|
| Already collected | This guest has already had this meal. Each guest gets it once, even when several servers scan at the same time. |
| Not checked in | The guest must check in at the desk first. |
| … is not allowed here | For example, a Delegate at the VIP Lounge door. |
| Ticket not recognised for this event | The code belongs to another event or is not a ticket. Ask for the Registration ID. |
| Scanning is paused at this point | An admin paused this meal or door. They can reopen it in Meals & access. |
Sponsors
Set up by the Client Admin, used by sponsor staff
Give each sponsor a booth link
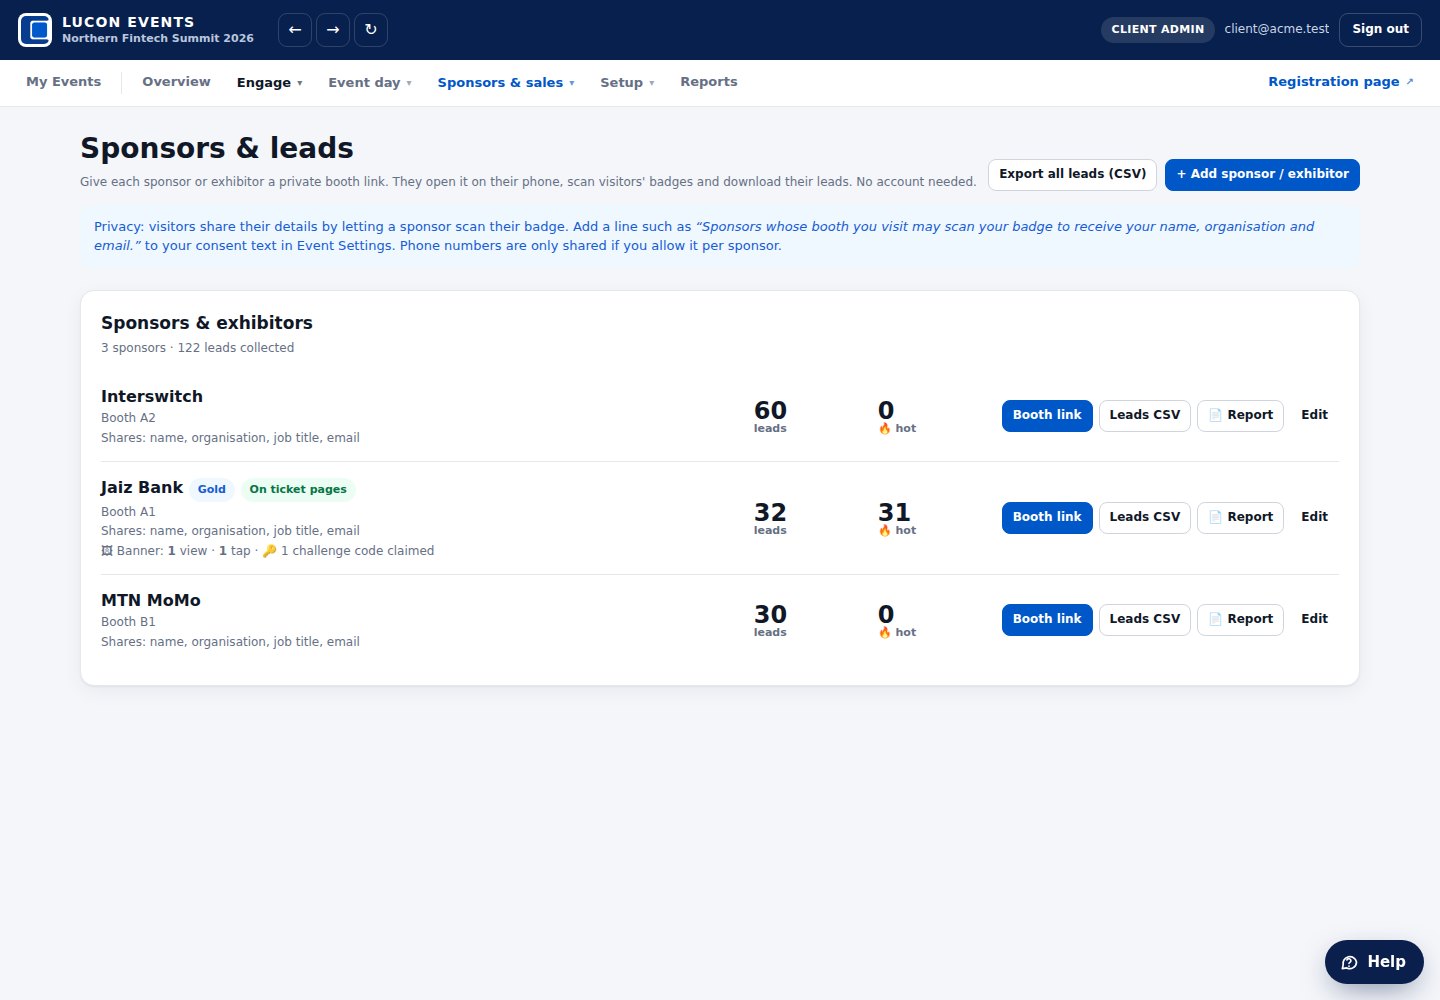
- Open Sponsors & leads and click + Add sponsor / exhibitor.
- Type the sponsor’s name and booth number. Choose what they may receive: email and/or phone.
- Click Booth link, then Copy link, and send it privately to the sponsor. They do not need an account.
At the booth
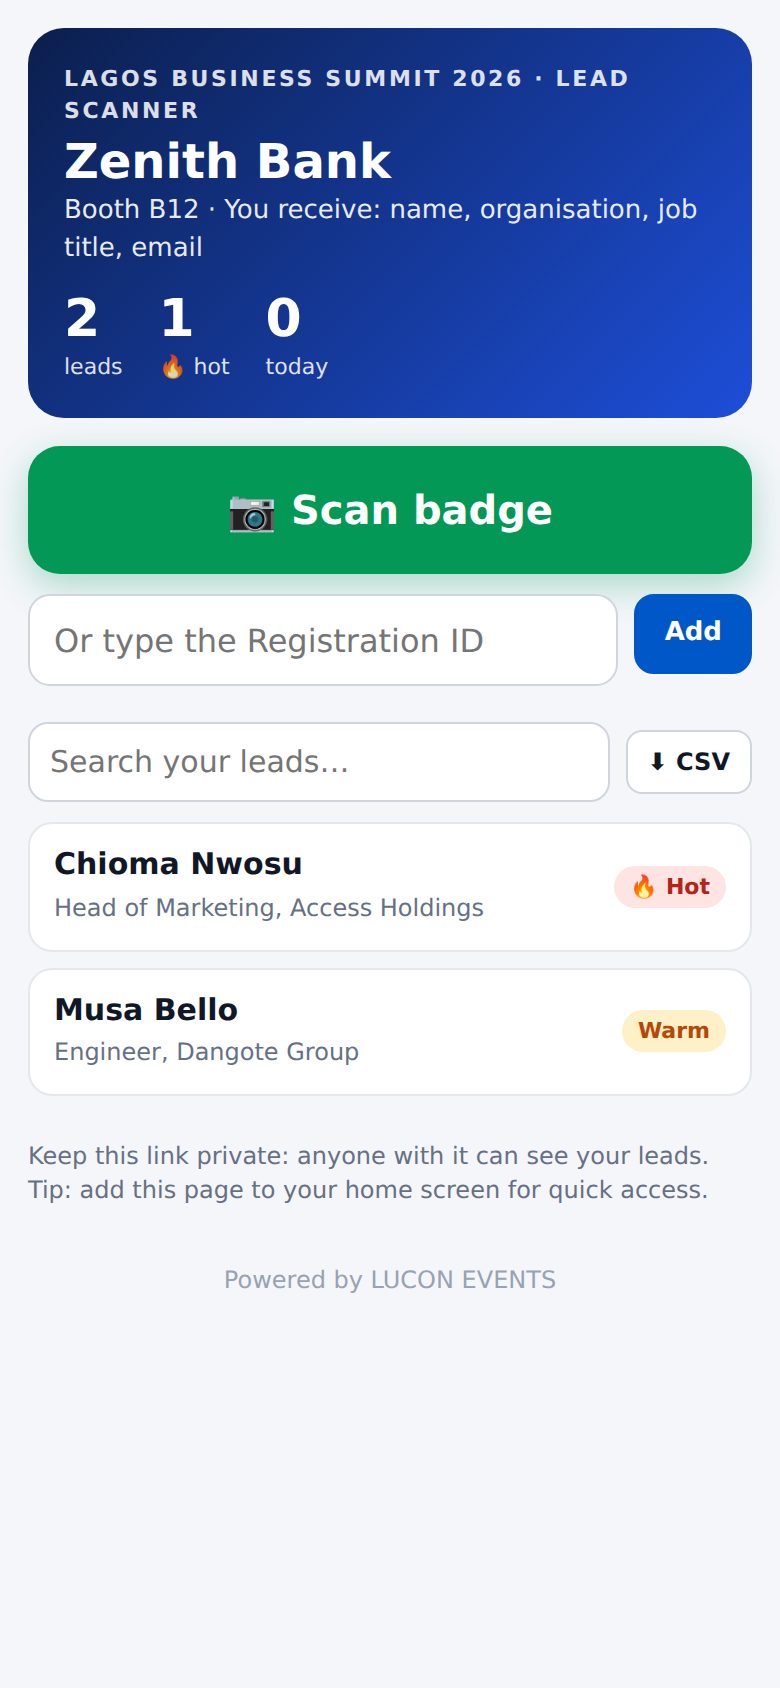
- The sponsor opens their booth link on a phone.
- They tap Scan badge and scan visitors’ badges.
- They rate each lead Hot, Warm or Cold and add notes.
- After the event they download their leads with ⬇ CSV.
Paid banners
- In Sponsors & leads, click Edit next to the sponsor.
- Under 🖼 Paid banner, choose the banner image (1200 × 300 pixels is best) and tick Show the banner (paid spot).
- The banner rotates at the top of every guest’s ticket page. Views and taps appear next to the sponsor and in their report.
Challenge & prizes
In Challenge & prizes, turn the challenge on, type the prizes and choose the points. Guests earn points for checking in, visiting booths, attending sessions, voting and more. Add secret codes for sponsors’ stands (🖨 Poster prints one). Show the top 10 on the Live screen with 📺 Show leaderboard on the big screen.
Scanning a badge
For anyone with a phone
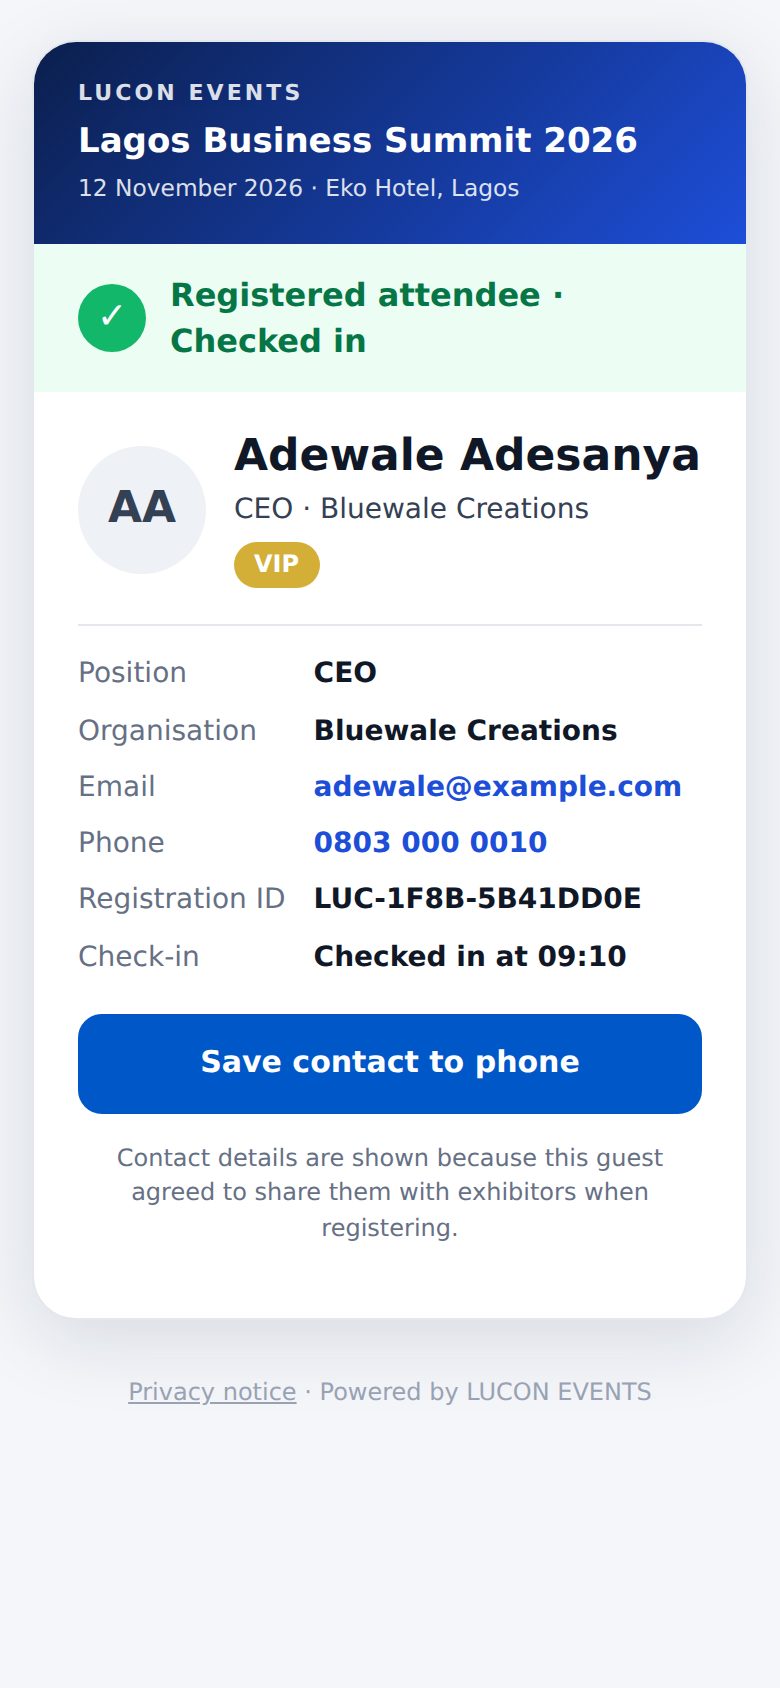
Anyone can check a badge with an ordinary phone camera, with no app and no sign-in. The phone opens a page from events.luconhouse.com showing:
- a green ✓ Registered attendee banner, and whether they are checked in;
- name, position, organisation and category;
- email and phone, only when the event required the consent box;
- a Save contact to phone button.
If the badge is fake, the page says Not a valid badge. If the guest is waiting for approval or was declined, it says so in orange or red.
Staff who are signed in on that phone also see Open at check-in desk.
Live screen, studio & reports
For the Client Admin, Super Admin and Viewers
Live screen
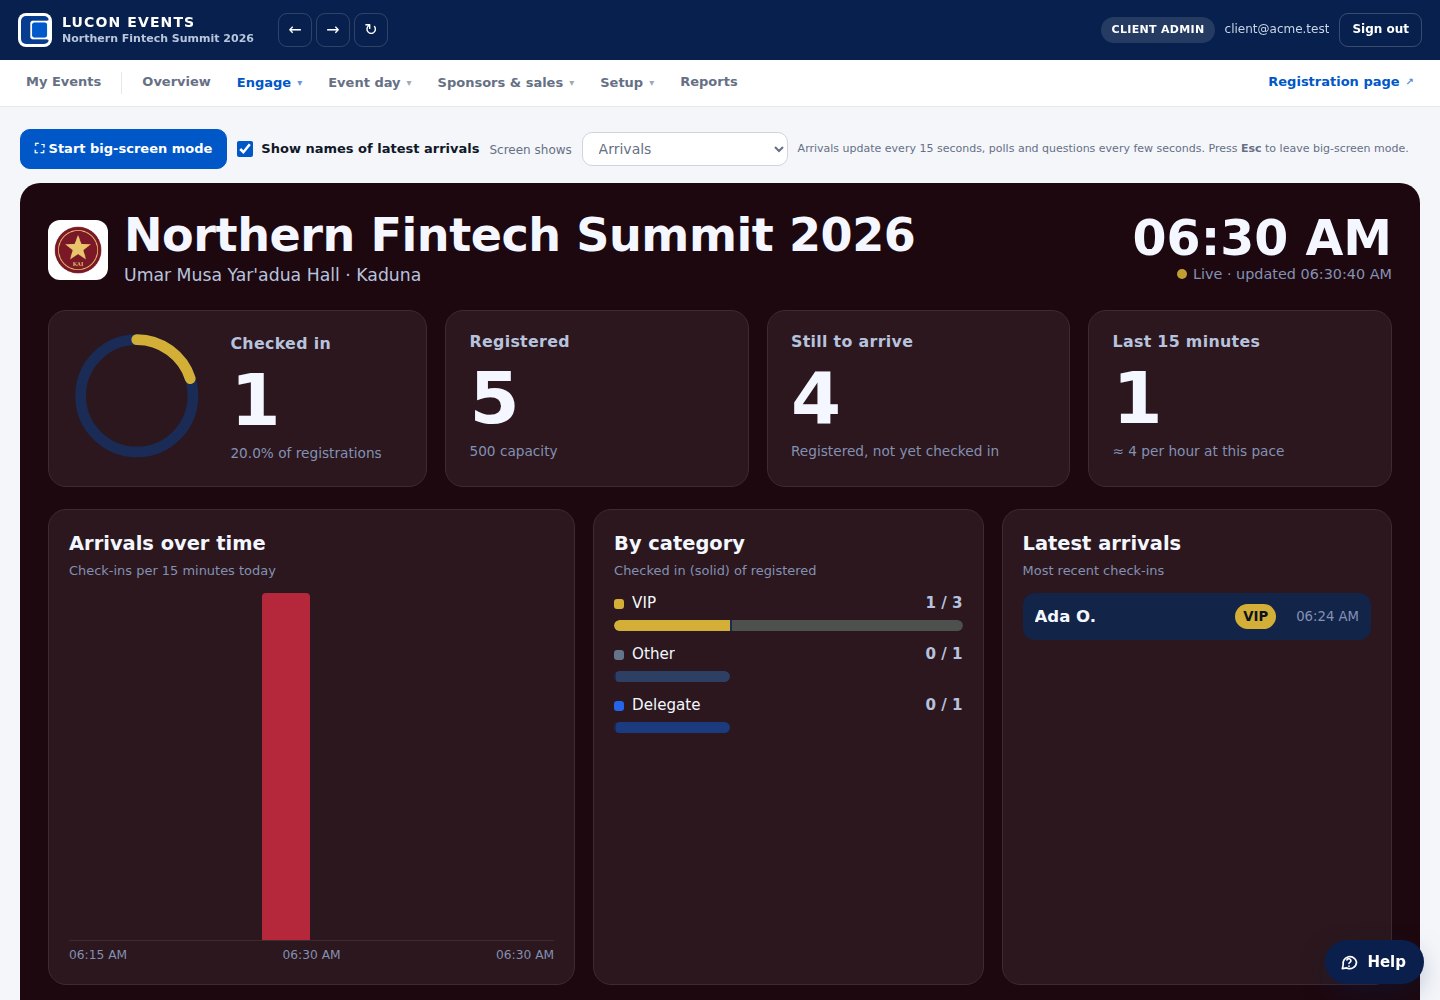
Open Live screen on a laptop connected to a projector or TV and click ⛶ Start big-screen mode. It shows arrivals, check-in rate, categories and the latest arrivals, and updates by itself. From Polls & Q&A you can switch it to poll results, questions, the challenge leaderboard or a rotation of sponsor banners.
Slides for guests
In the Agenda tab, use 📚 Slides & resources to upload slides or add links. Choose whether only registered guests can open them, and whether they appear straight away or after the session.
Lucon Studio (cameras, graphics, recording and going live)
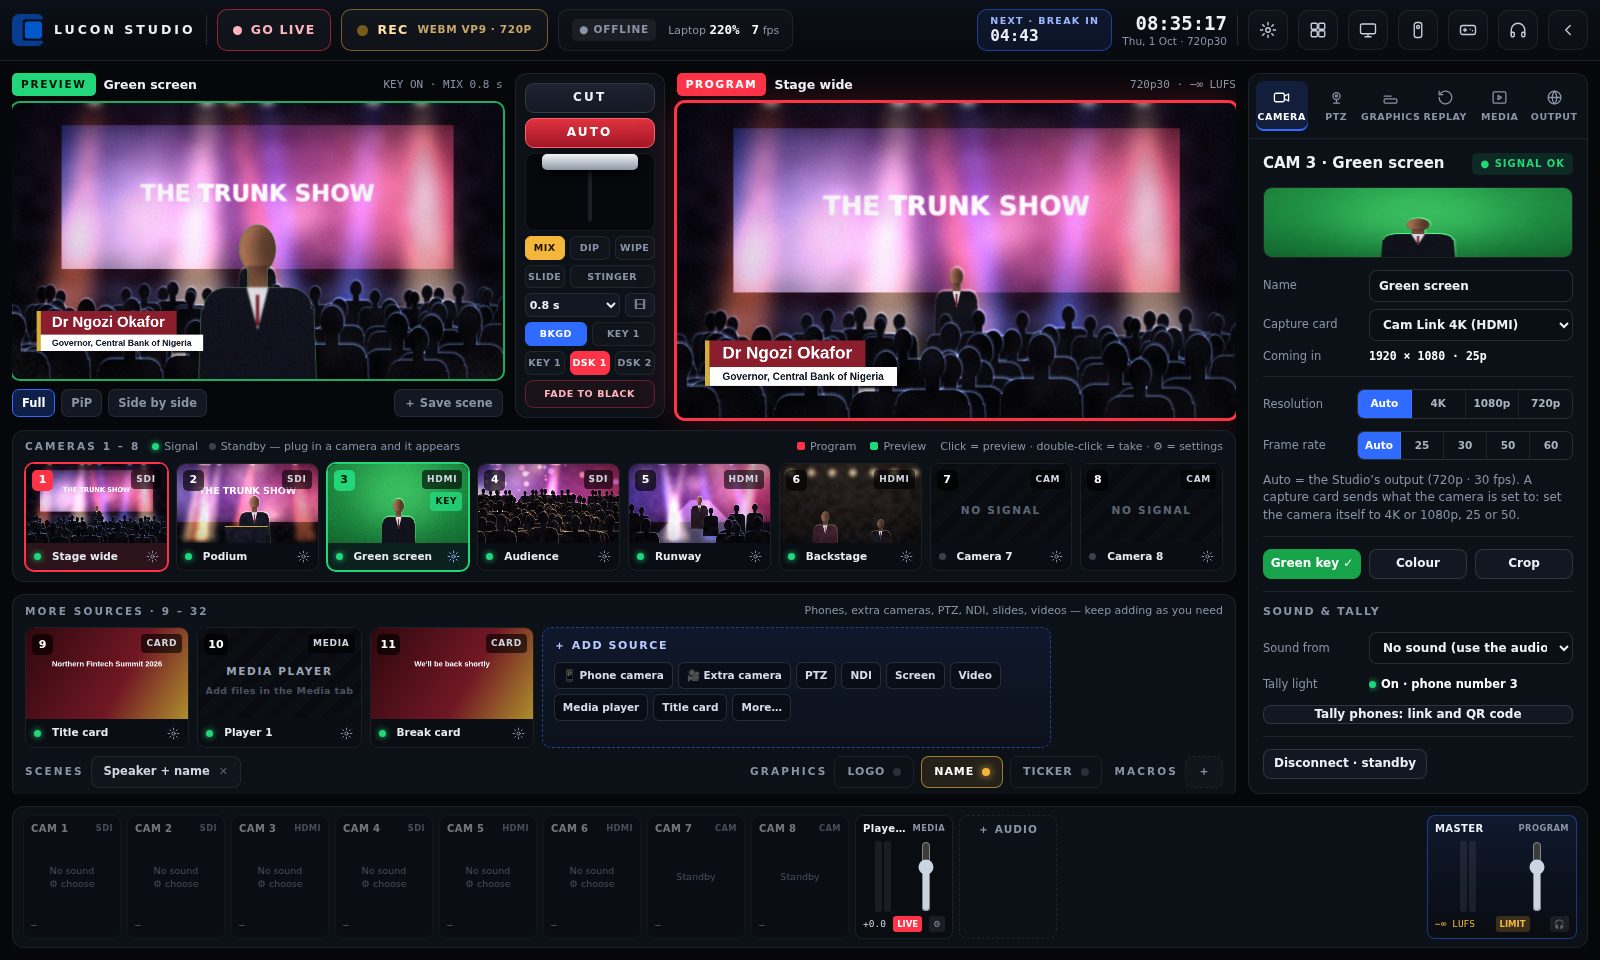
Open Event day → 🎬 Lucon Studio in Google Chrome on a laptop. Plug your capture cards (HDMI or SDI, from the cameras or the video mixer) into the laptop.
- The first time, Chrome asks to use the cameras: click Allow. Cameras 1 – 8 are always there. Each capture card you plug in appears on the next free camera by itself. An empty camera shows NO SIGNAL · Standby until you plug one in.
- Click a camera to put it in Preview (green). Press CUT (Enter) or AUTO (space bar) to send it to Program (red), or drag the T-bar. Double-click a camera to cut to it straight away.
- Click ⚙ on a camera to see what is coming in (for example 3840 × 2160 · 25p) and choose its resolution, frame rate, green key, colour, crop, sound and tally light.
- Need more? + Add source adds a phone camera, an extra camera, PTZ, NDI, your screen, a video, a media player or a title card (up to 32 sources).
- Graphics: LOGO, NAME and TICKER at the bottom, or the GRAPHICS tab for speakers' names, polls, Q&A, sponsor logos and cards.
- Set up the Preview the way you like and click + Save scene to switch to it with one click later.
- REC records the programme on the laptop. GO LIVE streams to YouTube, Facebook and Instagram and makes a ProRes recording, with Lucon Link (below).
Next to the T-bar: the transition (Mix, Dip, Wipe, Slide, Stinger) and its time; NEXT chooses whether Cut/Auto changes the picture (BKGD), KEY 1, or both; ON AIR puts KEY 1 (a presenter on green screen over the programme, chosen in Graphics → Key 1), DSK 1 (the name) or DSK 2 (the logo) on air at once; FADE TO BLACK fades the programme out.
Top bar: GO LIVE and REC show the time and the format while running; the health box shows how the broadcast is going (upload speed, dropped video and how busy the laptop is); click the countdown to set what comes next and when (only you see it); the clock; and buttons for output settings, Multiview, the Program window (Zoom or a projector), tally phones, controllers and listening.
Right panel: CAMERA (settings of the chosen camera or source), PTZ, GRAPHICS, REPLAY, MEDIA (playlists) and OUTPUT (picture size, recording, platforms and extra screens).
Output settings and 4K: click ⚙ in the top bar to choose the picture size (720p, 1080p, 1440p or 4K), the frame rate (match your cameras: most in Nigeria use 25 or 50) and the REC format. Click Test this laptop before a big show. With 4K and Lucon Link 1.2, the ProRes recording is 4K while YouTube, Facebook and Instagram get a lighter 1080p copy. 4K ProRes 422 HQ needs about 330 GB per hour, a fast drive and a strong laptop.
Sound: the audio desk at the bottom has a strip for each camera, then microphones, music and videos. Each has meters, a fader, LIVE / AFV (follow video) / MUTE and ⚙ for bass, voice, treble and delay (to match lips and voice). MASTER shows the loudness in LUFS (aim for about −14) and has a limiter that stops the sound from distorting. Use headphones with 🎧.
Tally lights: click 🚦, turn them on, and send the link to your camera operators. Each picks their camera number; the phone turns red when live and green when next.
Instant replay, media player and macros: the REPLAY tab replays the last 5–30 seconds (slow motion if you like); the MEDIA tab plays a list of videos, music and pictures; MACROS at the bottom runs several steps with one button or an F key. 🎛 sets keyboard keys, Stream Deck buttons and MIDI controllers.
Go live (YouTube, Facebook, Instagram) and professional recording: click GO LIVE. The first time, download Lucon Link (Windows or Mac), open it, click Install FFmpeg and paste your stream keys into the Lucon Link window. Then tick where to send the Programme and whether to make a professional recording (ProRes 422 HQ, ProRes 422, DNxHR HQ, MPEG-2 MXF or H.264), choose the stream quality and click ● Go live. Keep Lucon Studio and Lucon Link open until it says the broadcast has ended.
Run of show (SHOW tab): plan the service or event as a list of items, each with its minutes. Click Use a Sunday service template or + Add item, then click an item to set the speaker, the picture (a camera or a saved scene), media to play, the speaker’s name on screen and Scripture listening. During the show click START SHOW ▶, then NEXT ITEM ▶ (or NEXT ▶ in the top bar, or the N key): the picture, name, media and listening change by themselves. The tab shows how long is left, whether you are behind and the likely end time. ◀ goes back, +1:00 adds a minute, ❚❚ pauses the timer.
Stage screen (speaker timer): in the SHOW tab click Open on second screen ↗ for the monitor facing the stage, then double-click it for full screen. The speaker sees the time left (green, amber near the end, red counting up when over time), what is next and your messages: click Wrap up, 5 min and so on, or type a message and click SEND. For a phone, tablet or smart TV, click link and QR code (first time: run lucon-v55-stage.sql in Supabase).
Screens (🖥 SCREENS in the top bar): say what each LED wall, projector and TV shows: Program, a clean feed of one camera (no graphics, not the mix), Background, Stage timer, Scripture & lyrics, Media player or Announcements. Choose how each one is connected: a cable on this laptop (its own window), a quarter of a video wall splitter (one 4K output → 4 screens), or a TV box / smart TV (network link: timer, scripture, announcements and background). Click Open screen windows (Chrome may ask to manage windows on all your displays: click Allow), then double-click each window for full screen. Identify screens shows each screen’s number. SEND TO ALL ▶ puts the same picture on every screen (stage timers keep the timer); BACK TO NORMAL returns each screen to its own job. Backgrounds: import pictures or videos, tag them Worship, Music, Sermon or Offering; with Follow the Run of show they change by themselves with each item.
Audience (AUDIENCE tab): people join on their phones at the event’s Live page (QR on screen shows the code). Prayer & testimony: prayer requests are private (add them to the Pastor’s list and Send to stage for the stage screen and the pastor’s phone); testimonies are approved first, then ● Show on screen. Word cloud: + New word cloud (“What did you learn today?”), then ● Show on Program. Quiz: + Make a quiz, add questions with 2–4 answers and tick the right one, then ▶ Start; the answer shows by itself when time is up, then Show leaderboard and Next question ▶. ✨ Make quiz from today: tick what the AI reads (what the preacher said while SCRIPTURE listening was on, the verses shown, the notes outline, the run of show), optionally paste notes or upload a PDF, PowerPoint or Word file, choose how many questions and the level, then ✨ Write the quiz. Check each suggestion (Keep, Edit, ✕), then Add the kept questions to my quiz. It uses the same free Gemini key as the help assistant. Comments: read your YouTube live chat with your own free YouTube key (kept on this laptop) or type a Facebook/WhatsApp comment, then Show. Notes: send the sermon title, outline and every verse you show to the phones. LOOK changes the colours and style (presets or your own colours, rounded or square, normal or large text), and can apply them to all graphics. Word cloud, Quiz and Join QR can also go to any screen in SCREENS. First time: run lucon-v58-audience.sql in Supabase.
Songs (SONGS tab): search your church’s songs or the free public-domain hymns, + Add song for today’s part of the service (worship, choir ministration, and so on — it follows the run of show), then click a song to open its slides. NEXT LINE ▶ moves through the words on Program and on every SCREEN set to Scripture & lyrics; the singers see the line now and the line next on the stage screen. Keys: → next, ← back, C chorus, B bridge, Esc clear. + New or ✎ Edit words types or pastes the words (“Verse 1”, “Chorus”, a blank line between slides). ⬆ Import brings songs in from EasyWorship, ProPresenter, OpenLyrics/OpenSong/FreeShow, CCLI SongSelect or a text file — drop the files (for EasyWorship, the whole “Songs” folder) and it shows how many were found, new and already in your library before you import. Your church is responsible for its own CCLI licence or permission to use a song; add your CCLI licence number at the bottom of the tab and it is shown with the song’s credits. First time: run lucon-v60-songs.sql in Supabase.
Captions (CAPTIONS tab): Start live captions types out what the speaker says, using Chrome’s free speech service. It listens to the Program sound: every microphone, playback and Zoom that goes through the audio mixer (to use one microphone instead, open SCRIPTURE → Listening settings). SCRIPTURE and CAPTIONS can listen at the same time. Tick Hausa, Yoruba, Igbo or French to translate each finished sentence with the free Gemini AI (the same key as the help assistant). Captions go to: Program puts a caption bar at the bottom of the picture (choose its language and size), Screens only keeps Program clean. Under Screens · language per screen, choose a language for any screen to make it a captions screen. While captions are on, guests also get a Captions tab on the Live page and choose their own language. The free AI has a daily limit: if it is busy, translations catch up and English carries on. First time: run lucon-v61-captions.sql in Supabase.
Listen (LISTEN tab): guests hear the speaker in their own language on their phones, with earphones. Choose The speaker is speaking: English or Français (change it when a French speaker comes on; captions follow). The speaker’s language is the floor channel (choose Program sound or an input). For every other language, tick Offer: when an interpreter is on air, guests hear the interpreter; otherwise they hear Google’s AI voice reading the live translation (English, French, Hausa and Igbo; choose Female or Male) or captions only (Yoruba has no AI voice yet). 🔊 Test AI voice checks the voice on the laptop, and the Is it working? box shows each step (sound heard, translated, voice made, phones) in green, amber or red; 📣 Send a test sentence to phones checks the phones without anyone speaking. 🔗 Interpreter gives the link for an interpreter: they open it on their phone or laptop, type their name, choose their language, press Start hearing the speaker, then GO ON AIR; Hold to cough mutes them; if they are quiet for 30 seconds or their internet drops, guests hear the AI voice until they speak again. Press Start: phones can listen; guests open the Live page, tap 🎧 Listen, choose a language and press Start listening. First time: run lucon-v62-listen.sql in Supabase and set up the free Cloudflare relay (Realtime → Serverless SFU; put the App ID and App Secret in relay/config.php).
The Lucon Studio app (Mac and Windows): download it from events.luconhouse.com/app/studio (Mac with Apple chip, Mac with Intel, or Windows). The Lucon Events app has the Studio inside too, with registration, check-in and badges. It is the Studio in its own window with its own engine, so your Chrome tabs cannot slow it down, and Lucon Link and FFmpeg are built in (nothing else to install). Sign in with your usual email and password; it then opens straight to your last event. The first time on a Mac: open it, then System Settings → Privacy & Security → Open Anyway. On Windows: More info → Run anyway. The ● Lucon Link menu (top right on Mac, near the clock on Windows) shows the streaming engine, PTZ cameras and offline captions, and has Start when the computer starts and Check for updates. When a new version is ready the app tells you (Windows installs it when you restart; on a Mac you download it and replace the old one). After the first sign-in it also opens without internet (cameras, graphics, scripture, songs, recording and offline captions keep working; going live, translation, guests and the Room need internet).
Fixing one camera or one sound during the show: every camera and every audio channel has a small ⋯ button (or right-click it). Restart this camera restarts only the picture; Restart its sound only the sound. You can also change the device, turn a camera off for now, delete an audio channel (you get 8 seconds to undo) or listen to one channel in your headphones. A camera that stops gets a red edge.
Moving the panels: click LAYOUT at the top of the Studio. Drag a panel by its blue name (or use the arrows), hide what you do not use, move the tools to the other side or make them wider. Ready layouts: Classic, Big Program, Laptop and Two screens. Your layout is saved on that computer.
Lucon Studio on its own (free): people who only do video mixing can sign up at events.luconhouse.com/studio. They make productions (for example “Sunday Service”, every week) instead of events: no registration pages, just the Studio. A new production can copy an earlier one’s graphics, songs and colours. The Lucon Studio app opens this “My productions” page.
Offline captions (Whisper): in the app, live captions and the SCRIPTURE listener use Whisper, a free speech engine that runs on your computer: no sound leaves it and it works without internet. You can choose the engine in SCRIPTURE → Listening settings → Speech engine: Automatic (Whisper in the app, Chrome in the browser), Chrome (online) or Whisper (offline; in Chrome it needs Lucon Link 1.3 with offline captions, which comes with the app). The first words take a few seconds while Whisper loads. On a slow computer Lucon Studio says so and changes to the smaller Whisper by itself.
Themes (🎨 THEMES, top bar): one complete look for every graphic at once: names, scripture, lyrics, countdown, ticker, sponsors, logo, quiz and polls, testimonies and captions. Choose a category (Church, Conference, Wedding, Concert, Fashion, Corporate, Sports) or search, then click a theme to see its name graphic, scripture, lyrics and countdown. Use my event colours instead keeps the theme’s shapes and typefaces in your event colours; Colours → Change sets your own box, deep and accent colours. Try on Preview shows it on the Preview monitor only (a sample name appears if nothing is on screen): press ✓ Apply or ✕ Stop on the purple bar. ✓ Apply to this event changes Program for everyone on the team. + Make my own starts from any theme: name graphic design, colours, typefaces, moves, boxes, full screens, ticker and corners; Save to My themes keeps it for your team and every event. PRO themes are free to use for now. The fonts are stored on the site, so themes work offline too. First time: run lucon-v71-themes.sql in Supabase (needed only for My themes).
After the show (📋 RECAP, top bar): while you record or are live, the Studio quietly notes what is on screen: each sponsor logo and for how long (with 3 screenshots as proof), names, Bible verses, songs, picture changes, your recording files and the audience numbers. After the programme, open 📋 RECAP. At the top: how long it ran (against the run of show), viewers on the Live page, check-ins at the hall, the Room and LISTEN, and the audience’s prayers, testimonies and votes. ✨ Summary: the free Gemini AI reads the captions transcript and what was shown and writes a title, a short summary, key points, scriptures, a quote to share and next steps; choose English, Français, Hausa, Yorùbá or Igbo; ✎ Edit, Copy, WhatsApp, ⬇ Word or ⬇ PDF. 📣 Social posts: WhatsApp broadcast, Instagram/Facebook, X, an email newsletter and a blog article (replace [LINK] with your replay link). 🎬 Clips: the AI picks the 5 best 25–60 second moments; 🎞 Choose the recording (the file REC saved, or several parts), choose Vertical 9:16 (WhatsApp Status, Reels, TikTok) or Wide 16:9, then 🎬 Make clip: the laptop plays that part and saves a video with the words on screen, the title and your logo (a 1-minute clip takes about 1 minute; keep the window in front). ✎ changes a clip’s start, end or title. 🤝 Sponsors: time on screen, times shown, an estimate of people who saw it (hall check-ins + Live page + Room) and screenshots; ⬇ Report for each sponsor or all of them (save as PDF). 📋 Show report: the run of show planned against actual and everything shown. ⬇ Download everything saves it all in one folder. 🗑 Start fresh clears the show log and transcript for a new day (recordings are not touched). The summary and clips need live captions on during the programme. First time: run lucon-v69-recap.sql in Supabase.
Auto director (DIRECTOR tab): the Studio switches cameras by itself, like a director. OFF = you switch; ASSIST = it only puts its suggestion in Preview with a purple NEXT bar, and you press CUT; AUTO = it switches (Program shows ● AUTO). It always starts OFF when the Studio opens. Under Who speaks → which camera, link each microphone to its camera (camera sound and Zoom use their own picture; remote guests always use their own picture): when that voice speaks, it cuts to that camera. Under Cameras in the mix, give each camera a role: Wide (the safe shot), Speaker, Audience (cutaways), Choir / band, Other, or Not used. Styles: Sermon / talk (follows the speaker, a short audience cutaway after the longest shot, wide when nobody speaks), Worship / music (slow changes between the band, choir, wide and audience, with a mix), Panel / interview (follows whoever speaks, quickly), Announcements (calm, no cutaways). With Follow the run of show, the style changes by itself when a SHOW item starts (for example “Praise & worship” or “Sermon”). Set the shortest and longest shot under Pace. Skip a camera with nobody in it uses a free AI on the laptop (downloaded once) to check each camera for people. You are always in charge: CUT, AUTO, choosing a camera yourself, or ✋ HOLD THIS SHOT (key H) pauses it for 20 seconds. It never uses a camera with no signal, and it waits while Program shows something outside its mix (a video, a card or slides). What the director did lists each cut and why.
Guests and the Room (ROOM tab): bring people into the programme from anywhere, without Zoom. + Invite a guest makes a private link for one person (it works for 3 days): they open it on a phone or laptop, check their camera and microphone, and join backstage. You see and hear them in the ROOM tab (🎧 lets only you hear them). Each guest appears as a source tile (GUEST) and a fader in the audio mixer, silent until you press + Put on air; their picture then goes to Preview so you can CUT to it, alone, side by side or picture in picture, and 🏷 shows their name as a lower third. Up to 4 guests at once. Each guest hears the show without their own voice, so there is no echo, and can see the show picture. Hold 🎙 Talk to speak to one guest, or HOLD TO TALK TO THE STAGE for all of them: only they hear you, never the stream. The quick messages (2 minutes, 30 seconds, Please wrap up, Louder please, You are next, or your own) appear in big yellow letters on their screen. Hall speakers: tick Send the guests to the hall speakers and choose the laptop output that goes to the hall mixer; it leaves out everything that comes from the hall (microphones and cameras added in the mixer; change it with ⚙ on a fader), so there is no feedback. The Room (off until you tick Activate the Room): up to 150 people online watch about 1 second behind the hall, chat, send reactions and tap ✋ Raise hand. ▶ Open the Room, then share the link, QR code or WhatsApp. Raised hands appear oldest first; Bring to stage invites that person, and they join backstage like any guest. When the room is full, extra people are sent to the Live page. Choose the room size, the picture (480p recommended, 720p, or sound only) and chat. After the event: ⬇ Download the event pack saves one file with the chat, raised hands and questions, who joined and the captions transcript; the Room’s copy on the server is erased automatically 2 days after you close it (or the time you choose). Guests, the Room and LISTEN share your free Cloudflare relay allowance (1,000 GB a month): a guest uses about 1 GB an hour, a Room viewer about 0.27 GB an hour at 480p; Lucon closes the Room at 900 GB so you are never charged. First time: run lucon-v67-guests-room.sql in Supabase (the relay set-up is the same as LISTEN).
Bible verses (SCRIPTURE tab): choose the Bible (KJV, BSB, ASV or BBE, all free). Type a verse such as John 3:16 and press Enter, or type words to find a verse. Click START LISTENING when the sermon begins: when the preacher names a verse, the AI puts it under Suggested by AI. Click ● Lower third or Full screen to show it; nothing goes on air until you click. Use Next verse ▶ (or the ] key) as the preacher reads on, and HIDE when done. Both screens shows the verse full screen on the projector (Program window) and as a lower third on the livestream.
PTZ cameras: add them (name, IP address, VISCA type) in the Lucon Link window; the joystick, zoom and presets in the PTZ tab then work. Hold an arrow to move; click a preset to go there, Shift + click to save it. NDI: the free NDI Tools make NDI cameras appear as cameras (+ Add source → NDI) and can send the Program window out as NDI.
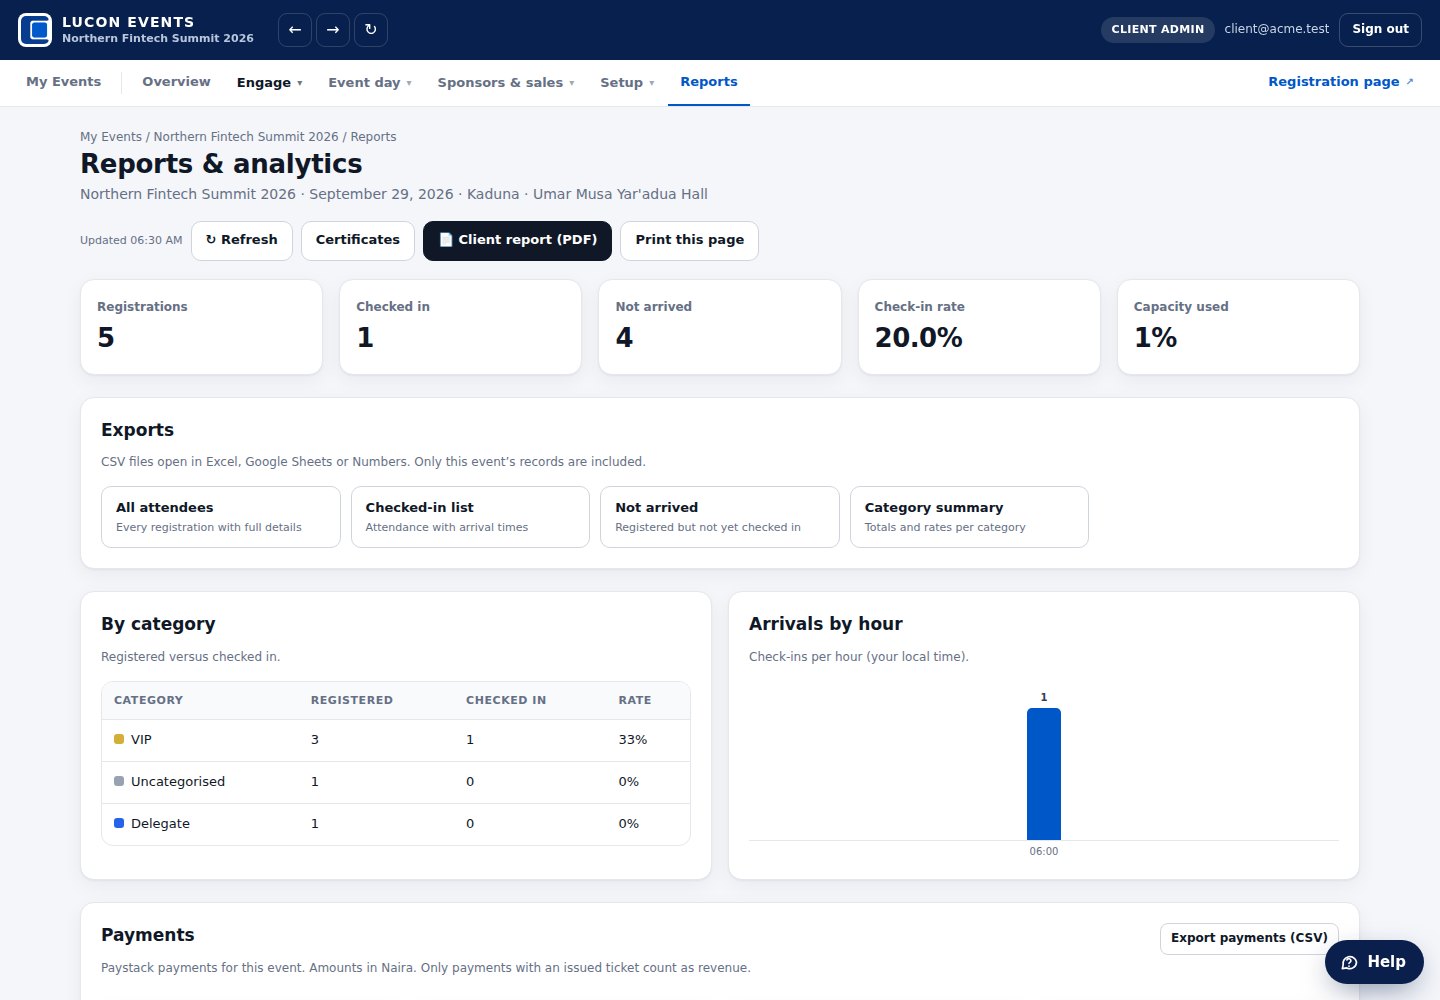
Reports
- Exports: download All attendees, the Checked-in list, Not arrived or the Category summary as CSV files that open in Excel.
- Executive report (PDF): a summary for the client after the event.
- Certificates: one A4 certificate of attendance per guest, ready to print or save as PDF.
- Payments: every Paystack payment for the event, with totals. Export with Export payments (CSV).
Event-day checklist
For the event lead
One week before
- Event details, categories and prices are correct. Staff-only categories are ticked.
- Registration test done on a phone, including one paid ticket, and the ticket email arrived.
- Logo, organiser name and colour theme saved in Event Settings; registration page checked on a phone.
- Badge design saved and a test badge printed on the real printer.
- Staff accounts created and added to the event with the right roles.
- Meals, zones, agenda and sponsors added. Booth links sent to sponsors.
The day before
- Every desk laptop signs in and opens Check-in & Printing. Desk and print method chosen.
- Printers loaded with badge stock. Zebra Browser Print running on Zebra desks.
- Optional: print badges in advance with Batch badge printing.
- Phones for meal and door staff are charged and signed in.
- Mobile data or a hotspot ready in case the venue Wi-Fi fails.
On the day
- Live screen running on the projector.
- One person watches the Overview for approvals and problems.
- Kiosk tested with one QR code before the doors open.
After the event
- Download reports and the executive report for the client.
- Check the certificate preview (style, signatures, logo); certificates appear on guests’ ticket pages automatically when switched on.
- Remove event access for temporary staff.
If something goes wrong
Quick answers
A guest did not receive their ticket email
Ask them to check spam and mark the email “Not spam”. At the desk, find them and click ✉ Email ticket. Check the email address on their record is spelled correctly.
Someone forgot their password
On the sign-in page they type their email and click Forgot password?. A reset link arrives from events@luconhouse.com. It works once and expires after 60 minutes.
A new staff member never got the welcome email
Super Admin: in Staff & access, type their email and password and click Resend login email.
“Wrong email or password”
Check the email for spaces and capital letters, then use Forgot password?. Too many wrong tries? Wait a few minutes.
The badge does not print
Check the printer is on and has stock. Check the desk’s Print method. For Zebra printers, check Zebra Browser Print is running. The check-in is already saved; fix the printer and click Print badge again, or use Retry in Stations & Printers.
The camera does not start
Allow camera access when the browser asks. If it was refused, allow it in the browser’s site settings. You can always type the Registration ID instead.
The meal scanner says “Ticket not recognised”
Check you chose the right meal point for this event. Type the Registration ID printed under the QR. If the badge was printed before an update, reprint it.
The colours or logo did not change
Click Save branding in Event Settings, then refresh the guest page. If ✨ Colours from my logo says it cannot read the logo, pick a ready-made theme or type the colour names instead.
I cannot find a page
Pages are inside the six menus at the top (see chapter 3, “Find your way”). If a menu is missing, your role does not include those pages; ask your Client Admin or Lucon House.
A page looks old or a button seems missing
Refresh the page. On a phone, close the tab and open the link again.
A payment went through but no ticket appeared
The guest should keep their Paystack receipt. Contact Lucon House with the payment reference (it starts with LUC-). Payments are checked and completed automatically; staff can also register the guest at the desk.
LUCON EVENTS · Lucon House Limited · Abuja, Nigeria